#how to fix the 9 most common wordpress errors
Explore tagged Tumblr posts
Visit Tumblr Blog
Explore Tumblr blogs with no restrictions, modern design and the best experience.
Last Seen Tumblr Blogs


Fun Fact
In 2020, 27% of US Tumblr users had an annual household income of over $100,000.
Text
Top DIY Website Errors to Fix

Creating a website yourself can feel like a cost-effective way to get online. Tools like WordPress, Wix, or Squarespace promise an easy, no-code path to a professional site. Just choose a template, add your content, and launch.
But DIY websites often hit obstacles that aren’t clear until they’re live and failing to deliver. Whether you’re a small business owner or a freelancer, avoiding these common mistakes can save you time, stress, and lost visitors.
Here’s what to watch out for and how to do better.
1. Design Overload or Underdesign
The mistake: Going too big or too small. Some DIY sites are chaotic with clashing fonts, colors, and effects. Others are so minimal they lack branding or appeal.
Why it matters: Overdesigned sites overwhelm users. Bland ones are forgettable. Both drive traffic away. The fix: Aim for simplicity. Use 1-2 fonts, 2-3 colors, and a clean layout (header, main, footer). Focus on function over flair.
2. Forgetting Mobile Devices
The mistake: Building only for desktops. A site that shines on your laptop might break on a phone—text misalign infectiously, buttons are tiny, images don’t fit.
Why it matters: Mobile users make up over half of web traffic. A non-mobile-friendly site is a dealbreaker. The fix: Start with a responsive template. Test every page on multiple devices to ensure it’s user-friendly.
3. Poor Navigation Setup
The mistake: Making navigation a puzzle. Hidden menus, complex dropdowns, or unclear links frustrate users trying to find what they need.
Why it matters: If visitors can’t navigate easily, they’ll leave immediately. The fix: Keep menus clear and concise: Home, About, Services, Contact. Avoid unnecessary complexity.
4. Sluggish Load Times
The mistake: Bogging down your site with heavy elements. Large images, bloated themes, or excessive plugins can make your site slow to load.
Why it matters: Slow sites lose users and rank poorly on search engines. Most won’t wait past 3 seconds. The fix: Compress images, use lightweight templates, and minimize plugins. Check with Google PageSpeed Insights for issues.
5. Missing Calls to Action
The mistake: Not telling users what to do next. Without clear guidance, visitors won’t know whether to buy, contact, or book your services.
Why it matters: Calls to action (CTAs) drive conversions. Without them, you lose opportunities. The fix: Add bold CTAs like “Contact Us,” “Shop Now,” or “Get Started.” Place them prominently on every page.
6. Ignoring SEO Basics
The mistake: Neglecting search engine optimization. Many DIY platforms don’t prioritize SEO, and beginners often skip keywords, meta tags, or alt text.
Why it matters: No SEO means no visibility on search engines. The fix: Use keywords naturally, add meta titles/descriptions, use proper headings, and include alt text for images.
7. Scattered Branding
The mistake: Inconsistent look and feel. Mismatched logos, fonts, or tones across pages make your site feel amateurish.
Why it matters: Strong branding builds trust. Inconsistency undermines credibility. The fix: Choose one logo, color scheme, and tone. Check your site as a new visitor to ensure it’s cohesive.
8. Sticking to Default Templates
The mistake: Not personalizing enough. Stock photos, placeholder text, or default layouts make your site look generic and rushed.
Why it matters: Generic sites don’t inspire confidence. The fix: Replace all defaults with your own content. A cheap website designer can help personalize affordably if you’re pressed for time.
9. No Backups
The mistake: Skipping site backups. Without backups, a crash or bad update can erase your entire site.
Why it matters: Losing your work means starting over. The fix: Enable automatic backups via your CMS or host. Save a manual copy before big changes.
10. Burning Time on DIY Struggles
The mistake: Spending weeks on a mediocre site. Trying to save money can cost you hours of tweaking, often with subpar results.
Why it matters: A weak site loses customers, and your time is valuable too. The fix: Delegate when needed. Cheap web design services or a cheap web designer can deliver a professional site quickly.
Bottom Line
DIY websites can work if you avoid these traps. Poor design, mobile issues, or missing CTAs can sink your efforts. Build with purpose, test thoroughly, and seek help when necessary.
Affordable web design services or a cheap web designer can elevate your site without breaking the bank. Your website is your digital front door—make it welcoming and effective.
0 notes
Link
How to Fix the 9 Most Common WordPress Errors
WordPress error… The worst way to start a Google search – learn how to fix the 9 Most Common WordPress Errors here.
WordPress is the most used CMS on the planet and powers around 29% of the global internet. It is the first choice for millions of people, including developers, when they need to create an SEO optimized website, eCommerce site or blog. It is also the best tool to take your business or brand to your targeted audience.
With so many positive factors, there are certain “common errors” that many people run into on WordPress. This article covers the 9 most common WordPress errors and more importantly, how to fix these common WordPress errors.
1. Error establishing a database connection WordPress
This is a pretty terrifying error message to see when working with WordPress. It will break your site and can even make it pretty hard to access the admin in most cases. Chances are that you’ve accidentally done something to break the connection between your WordPress website and the database that holds all your information.
Finding and correcting an error establishing a database connection in WordPress is a total pain in the ass.
If you’re managing your own site — you don’t want to do this.
It is far better to take a preventative or at least prepared course of action by using a WordPress host that will resolve the issue for you; such as WP Engine.
If you have already run into this issue and need to resolve it yourself, walk through these steps on Kinsta’s blog.
2. Locked out of WordPress admin
If you have found that you have been locked out of your WordPress — the first thing that you need to do is try to recover your password available from the given WordPress login screen.
In the case that you don’t receive the reset email, well, then there could be one of several issues that will need troubleshooting. Lost admin privileges can range from simple to pretty complex, but the folks at mythemeshop have put together a great video to help you straighten it out:
3. WordPress Stuck in Maintenance Mode
Chances are that if you’re seeing this message you just updated a whole bunch of plugins on your WordPress site. It’s tempting to update everything at once, but you’ll quickly find this can cause problems.
If your website is stuck in maintenance mode, it means the .maintenance file was left behind after updates were performed. To fix the issue, you can simply remove the .maintenance file. The easiest way to do this is via SFTP.
In the document root of your website, there will be a file named .maintenance. Right-click the .maintenance file in the list, and select to delete or remove it.
If you can’t locate this file or the .maintenance file seems to be missing, please contact your hosting company.
4. WordPress 404 error Page or Post Not Found
The main cause of this error is the .htaccess file.
There are actually several variations of this error, but they all mean that a page can’t be found.
In 99% of such cases, these problems will disappear just by making some simple clicks on the save changes button on the Permalinks Settings page found on your WordPress Admin dashboard. This will force WordPress to rewrite the .htaccess file generally fixing the errors.
If you are getting the 404 error on all the WordPress pages but not the home page, you should fix the problem using the following steps:
Log into the dashboard
Click on ‘settings’ and then on ‘permalinks’
Click on ‘select the default setting’
Click on ‘save’
Now revert the settings back to previous form
Click on ‘save settings’
If this does not work, you will need to edit your .htacess file with new code by resetting the rewrite rules of the file .htaccess. But this will require that you access your WP site using an FTP server.
Follow these steps to set up an FTP client:
Download an FTP client (if you don’t already have one, click here for a list of the best)
Open the FTP client
Enter your website’s name
Enter your domain name in the ‘host’ section
Leave the ‘port’ section blank
Select FTP for ‘protocol’
Select plain FTP for ‘encryption’
Select normal as the ‘logon type’
Then enter your control panel’s username and password
click on ‘connect’ for connecting the FTP
Follow these steps to reset the rewrite rules:
Open your WP site’s root directory within the FTP client
Click on ‘server’
Select the option ‘force showing hidden files’ (this is important for showing all the hidden files because the .htaccess file may also be hidden by default.
Right click on the .htaccess file
Click on ‘file permissions’
Now you should make the .htaccess file writable.
*This can be done by using the following steps: (it can be risky editing your htaccess file, if you don’t feel comfortable doing this contact your hosting provider or a developer).
Enter the value 666
Click on ‘save’
Click on ‘refresh’
Go to WordPress and open ‘permalink settings’
Click on ‘save changes’
Go back to the FTP client and make changes to the .htaccess’ file permissions to 644
Refresh the client
5. WordPress White Screen PLEASE HELP ME!
This is the most dreaded error found in the WordPress community and is also referred to as the White Screen of Death or WSoD. When this error occurs, you won’t see an error message stating the reason. Oh, and you’ll be locked out of your WordPress admin — because that’s always helpful.
Again, this is the type of error where having the right WordPress hosting makes a huge difference.
Why?
Because the simplest and quickest way to resolve this problem is to have the ability to “roll-back” to a recently saved back up point.
If restoring your website is not an option, you’re most likely going to have to walk through a series of time consuming steps to figure out the culprit and fix the issue. If you have to do that, click here, for Kinsta’s Detailed Guide on this process.
6. An Automated WordPress Update Has Failed
It is important to keep WordPress updated always.
Most of the time, it will update automatically and everything goes as it should, but every once-in-a-while you do run across a failed auto-update.
It could be from something as stupid as an interrupted internet connection or also very commonly caused by file permissions. In case like the latter you can even run into the dreaded WSoD, or notice some warning errors.
The easiest fix:
1. Delete your maintenance file as illustrated in Step 3 Above.
If that fails, click here, and follow the steps outlined.
7. Issues in image uploading
The image upload issue in WordPress is typically caused by incorrect file permissions. Your WordPress files are stored on your web hosting server and need specific file and directory permissions to work.
Wrong file permissions prevent WordPress from reading or uploading file on the hosting server. You may get the following error when uploading image file:
‘Unable to create directory wp-content/uploads/2019/04. Is its parent directory writable by the server?’
For complete instructions on resetting your file permissions and resolving common WordPress image upload issues – Click Here.
8. WordPress 403 Forbidden error
The WordPress 403 Forbidden error is the consequence of a server refusing a request due to a lack of proper permissions. Therefore, it makes sense to start your troubleshooting by checking whether your WordPress files have the correct permissions.
I really hate this, because typically you end up spending more time trouble-shooting the issue rather than fixing the issue.
I hate to say it again, but in this scenario — I would opt for the roll back to your most previous back up point.
If you can’t do that then watch this video from WP Beginner:
9. Syntax error
Sometimes, when you are changing the code of WordPress, it might result in different syntax errors. Fortunately, WordPress will inform about the file that caused the error and locates the line has an error in the code. Just making the right alterations will be enough to fix the issue.
Other times this error can keep you from making any edits or updates to your site, but don’t worry — this can be fixed relatively easily. Just watch this video:
Final thoughts
WP is the strong platform but just like any software platform — there’s opportunity for error. The above errors are the common ones and by now you might have known to fix them to make efficient use of them.
0 notes
Text
WordPress 101: Getting Your Website Up and Running
Did you know that over 75 million websites are made on WordPress? That’s almost 22% of all websites around the world. The following are some of the issues which usually creep up while using WordPress and the ways in which those issues can be fixed. So, stay alert because school is in session.
Your WP Site’s Security
WordPress websites are usually attacked by hackers, or in hacker lingo, script kiddies who can creep into your WordPress websites via some common WordPress security vulnerabilities. When looking to secure your WordPress website it is best to start from the ground up.
While there are many plugins that can act as a firewall for your WP website some of them can also work by modifying your .htaccess file or restricting some access at the Apache level, before it can be processed by WordPress. Some great examples are WordFence or All in One WordPress Security.
Antispam Bee and Growmap Anti Spambot are also all great plugins to keep your site safe from hackers and spammers.
WP Site SEO
After you get the peace of mind that the hackers are at bay, you will need to concentrate on getting the SEO part of your WP website right. While the All in One SEO Pack will get you the tools you need to optimize your site you will need some specific plugins to deal with some of the most common SEO issues. One of the main ideas is being able to track your website’s visitors. For that, plugins like Clicky add a small stats indicator. You can also use Google Analytics by Yoast to keep track of how your WP site is doing on the SERPs. While Yoast has not given people problems in the past, recently some users have complained about receiving a 404 error. A way out of this problem is pretty simple. All you will have to do is open WordPress SEO plugin > Edit Files option and write in the following code.
# WordPress SEO – XML Sitemap Rewrite Fix
RewriteEngine On RewriteBase / RewriteRule ^sitemap_index.xml$ / index.php?sitemap=1 [L] RewriteRule ^([^/]+?) –sitemap([0-9]+)?.xml$ /index.php? Sitemap=$1&sitemap_n=$2 [L]
# END WordPress SEO – XML Sitemap Rewrite Fix
Needless to say, WP Google Analytics and Google XML Sitemaps are also two of the best ways to track WP site statistics. The tools are both easy to grasp and get a hand of even for beginners.
Best Sources for WP Themes
There’s really nothing like a stunning custom theme to set your website apart. Easy Theme and Plugin Upgrades makes your life easy by doing all the heavy lifting for you. Other favorites include Customizr, OmaGue, Xodogo, and well, the WordPress themes directory where you will find all kinds of themes from full screen and slider themes to responsive themes and everything in between.
When you have the designs ready, another important step is to turn your designs into a fully-functional site. Luckily, there are professional web development services like psd2html.com, that can help you out with your WordPress implementations and settings. This is a great way to avoid hassle and save time. The workflow is very straightforward, get a free quote anytime you are ready to bring your blog to life.
Best Social Plugins
Giving the ability to your audience to bookmark and share the content of your WP site is the best thing you can do to make sure the content stays fresh and your business stays in their minds. Sociable is the leader when it comes to sharing within the WordPress space. It continues to be the fastest growing plugin for setting rating systems and for reminding your readers to spread the word. Other notable plugins like ShareThis and AddThis are also used for sharing recommended content.
Best Plugins Offering Contact Us Forms Customizations
Plugins also allow users to create their own contact forms that can give your business a professional look and simplify online communication. Fast Secure Contact Form is an easy and powerful form builder. If you don’t already have Jetpack by WordPress you should seriously consider installing it for your website. Slick Contact Form is another widget based plugin which can be used to create customizable contact us forms. It can also handle multiple forms per page to give your website a more powerful effect. Contact Form 7 is another popular plugin which has been downloaded over 16 million times by WP users. Using plugins is by far the easiest way to get the job done no matter what it may be.
Ending Note
If you put all of these in place but fail to monitor or update your WP website it will be just as bad as if you’d never done any of this to begin with. So, use these plugins and exercise constant diligence to get yourself a water sealed abracadabra kind of WordPress website which is safe for doing business or shooting up a blog.
1 note
·
View note
Text
Wscube Tech-Training program
Introduction :-wscube is a company in jodhpur that located in address First Floor, Laxmi Tower, Bhaskar Circle, Ratanada, Jodhpur, Rajasthan 342001.wscube tech one of leading web design and web development company in jodhpur ,india. wscube provide many services/ training for 100% job placement and live project.
About us:-:WsCube Tech was established in the year 2010 with an aim to become the fastest emerging Offshore Outsourcing Company which will aid its clientele to grow high with rapid pace. wscube give positive responsible result for the last five year.
Wscube work on same factor
1>We listen to you
2>we plan your work
3>we design creatively
4>we execute publish and maintain
Trainings:-
1>PHP Training:-For us our students is our top priority.this highly interactive course introduces you to fundamental programming concepts in PHP,one of the most popular languages in the world.It begins with a simple hello world program and proceeds on to cover common concepts such as conditional statements ,loop statements and logic in php.
Session 1:Introduction To PHP
Basic Knowledge of websites
Introduction of Dynamic Website
Introduction to PHP
Why and scope of php
XAMPP and WAMP Installation
Session 2:PHP programming Basi
syntax of php
Embedding PHP in HTML
Embedding HTML in PHP
Introduction to PHP variable
Understanding Data Types
using operators
Writing Statements and Comments
Using Conditional statements
If(), else if() and else if condition Statement
Switch() Statements
Using the while() Loop
Using the for() Loop
Session 3: PHP Functions
PHP Functions
Creating an Array
Modifying Array Elements
Processing Arrays with Loops
Grouping Form Selections with Arrays
Using Array Functions
Using Predefined PHP Functions
Creating User-Defined Functions
Session 4: PHP Advanced Concepts
Reading and Writing Files
Reading Data from a File
Managing Sessions and Using Session Variables
Creating a Session and Registering Session Variables
Destroying a Session
Storing Data in Cookies
Setting Cookies
Dealing with Dates and Times
Executing External Programs
Session 5: Introduction to Database - MySQL Databas
Understanding a Relational Database
Introduction to MySQL Database
Understanding Tables, Records and Fields
Understanding Primary and Foreign Keys
Understanding SQL and SQL Queries
Understanding Database Normalization
Dealing with Dates and Times
Executing External Programs
Session 6: Working with MySQL Database & Tables
Creating MySQL Databases
Creating Tables
Selecting the Most Appropriate Data Type
Adding Field Modifiers and Keys
Selecting a Table Type
Understanding Database Normalization
Altering Table and Field Names
Altering Field Properties
Backing Up and Restoring Databases and Tables
Dropping Databases and Table Viewing Database, Table, and Field Information
Session 7: SQL and Performing Queries
Inserting Records
Editing and Deleting Records
Performing Queries
Retrieving Specific Columns
Filtering Records with a WHERE Clause
Using Operators
Sorting Records and Eliminating Duplicates
Limiting Results
Using Built-In Functions
Grouping Records
Joining Tables
Using Table and Column Aliases
Session 8: Working with PHP & MySQL
Managing Database Connections
Processing Result Sets
Queries Which Return Data
Queries That Alter Data
Handling Errors
Session 9: Java Script
Introduction to Javascript
Variables, operators, loops
Using Objects, Events
Common javascript functions
Javascript Validations
Session 10: Live PHP Project
Project Discussion
Requirements analysis of Project
Project code Execution
Project Testing
=>Html & Css Training:-
HTML,or Hypertext markup language,is a code that's used to write and structure every page on the internet .CSS(cascading style sheets),is an accompanying code that describes how to display HTML.both codes are hugely important in today's internet-focused world.
Session 1: Introduction to a Web Page
What is HTML?
Setting Up the Dreamweaver to Create XHTML
Creating Your First HTML page
Formatting and Adding Tags & Previewing in a Browser
Choosing an Editor
Project Management
Session 2: Working with Images
Image Formats
Introducing the IMG Tag
Inserting & Aligning Images on a Web Page
Detailing with Alt, Width & Height Attributes
Session 3: Designing with Tables
Creating Tables on a Web Page
Altering Tables and Spanning Rows & Columns
Placing Images & Graphics into Tables
Aligning Text & Graphics in Tables
Adding a Background Color
Building Pages over Tracer Images
Tweaking Layouts to Create Perfect Pages
Session 4: Creating Online Forms
Setting Up an Online Form
Adding Radio Buttons & List Menus
Creating Text Fields & Areas
Setting Properties for Form Submission
Session 5: Creating HTML Documents
Understanding Tags, Elements & Attributes
Defining the Basic Structure with HTML, HEAD & BODY
Using Paragraph Tag to assign a Title
Setting Fonts for a Web Page
Creating Unordered & Ordered and Definition Lists
Detailing Tags with Attributes
Using Heading Tags
Adding Bold & Italics
Understanding How a Browser Reads HTML
Session 6: Anchors and Hyperlink
Creating Hyperlinks to Outside Webs
Creating Hyperlinks Between Documents
Creating a link for Email Addresses
Creating a link for a Specific Part of a Webpage
Creating a link for a image
Session 7: Creating Layouts
Adding a Side Content Div to Your Layout
Applying Absolute Positioning
Applying Relative Positioning
Using the Float & Clear Properties
Understanding Overflow
Creating Auto-Centering Content
Using Fixed Positioning
Session 8: Introduction to CSS
What is CSS?
Internal Style Sheets, Selectors, Properties & Values
Building & Applying Class Selectors
Creating Comments in Your Code
Understanding Class and ID
Using Div Tags & IDs to Format Layout
Understanding the Cascade & Avoiding Conflicts
Session 9: Creative artwork and CSS
Using images in CSS
Applying texture
Graduated fills
Round corners
Transparency and semi-transparency
Stretchy boxes
Creative typography
Session 10: Building layout with CSS
A centered container
2 column layout
3 column layout
The box model
The Div Tag
Child Divs
Width & Height
Margin
Padding
Borders
Floating & Clearing Content
Using Floats in Layouts
Tips for Creating & Applying Styles
Session 11: CSS based navigation
Mark up structures for navigation
Styling links with pseudo classes
Building a horizontal navigation bar
Building a vertical navigation bar
Transparency and semi-transparency
CSS drop down navigation systems
Session 12: Common CSS problems
Browser support issues
Float clearing issues
Validating your CSS
Common validation errors
Session 13: Some basic CSS properties
Block vs inline elements
Divs and spans
Border properties
Width, height and max, min
The auto property
Inlining Styles
Arranging Layers Using the Z Index
Session 14: Layout principles with CSS
Document flow
Absolute positioning
Relative positioning
Static positioning
Floating elements
Session 15: Formatting Text
Why Text Formatting is Important
Choosing Fonts and Font Size
Browser-Safe Fonts
Applying Styles to Text
Setting Line Height
Letter Spacing (Kerning)
Other Font Properties
Tips for Improving Text Legibility
Session 16: Creating a CSS styled form
Form markup
Associating labels with inputs
Grouping form elements together
Form based selectors
Changing properties of form elements
Formatting text in forms
Formatting inputs
Formatting form areas
Changing the appearance of buttons
Laying out forms
Session 17: Styling a data table
Basic table markup
Adding row and column headers
Simplifying table structure
Styling row and column headings
Adding borders
Formatting text in tables
Laying out and positioning tables
=>Wordpress Training:-
Our course in wordpress has been designed from a beginners perspective to provide a step by step guide from ground up to going live with your wordpress website.is not only covers the conceptual framework of a wordpress based system but also covers the practical aspects of building a modern website or a blog.
Session 1: WordPress Hosting and installation options
CMS Introduction
Setting up Web Hosting
Introduction to PHP
Registering a Domain Name
Downloading and Installing WordPress on your Web Space
Session 2: WordPress Templates
Adding a pre-existing site template to WordPress
Creating and adding your own site template to WordPress
Note - this is an overview of templates - for in-depth coverage we offer an Advanced WordPress Course
Session 3: Configuring WordPress Setup Options
When and How to Upgrade Wordpress
Managing User Roles and Permissions
Managing Spam with Akismet
Session 4: Adding WordPress Plugins
Downloading and Installing plugins
Activating Plugins
Guide to the most useful WordPress plugins
Session 5: Adding Content
Posts vs Pages
Adding Content to Posts & Pages
Using Categories
Using Tags
Managing User Comments
Session 6: Managing Media in WordPress
Uploading Images
Basic and Advanced Image Formatting
Adding Video
Adding Audio
Managing the Media Library
Session 7: Live Wordpress Project
Project Discussion
Requirements analysis of Project
Project code Execution
Project Testing
2>IPHONE TRAINING:-
Learn iphone app development using mac systems,Xcode 4.2,iphone device 4/4S/ipad, ios 5 for high quality incredible results.with us, you can get on your path to success as an app developer and transform from a student into a professional.
Iphone app app development has made online marketing a breeze .with one touch,you can access millions of apps available in the market. The demand for iphones is continually rising to new heights - thanks to its wonderful features. And these features are amplified by adding apps to the online apple store.
The apple store provides third party services the opportunity to produce innovative application to cater to the testes and inclinations of their customers and get them into a live iphone app in market.
Session 1: Introduction to Mac OS X / iPhone IOS Technology overview
Iphone OS architecture
Cocoa touch layer
Iphone OS developer tool
Iphone OS frameworks
Iphone SDK(installation,tools,use)
Session 2: Introduction to Objective – C 2.0 Programming language / Objective C2.0 Runtime Programming
Foundation framework
Objects,class,messaging,properties
Allocating and initializing objects,selectors
Exception handling,threading,remote messaging
Protocols ,categories and extensions
Runtime versions and platforms/interacting with runtime
Dynamic method resolution,Message forwarding,type encodings
Memory management
Session 3: Cocoa Framework fundamentals
About cocoa objects
Design pattern
Communication with objects
Cocoa and application architecture on Mac OS X
Session 4: Iphone development quick start
Overview of native application
Configuring application/running applications
Using iphone simulator/managing devices
Session 5: View and navigation controllers
Adding and implementing the view controller/Nib file
Configuring the view
Table views
Navigation and interface building
AlertViews
Session 6: Advanced Modules
SQLite
User input
Performance enhancement and debugging
Multi touch functions,touch events
Core Data
Map Integration
Social Network Integration (Facebook, Twitter , Mail)
Session 7: Submitting App to App Store
Creating and Downloading Certificates and Provisioning Profiles
Creating .ipa using certificates and provisioning profiles
Uploading App to AppStore
3>Android training:- The training programme and curriculum has designed in such a smart way that the student could familiar with industrial professionalism since the beginning of the training and till the completion of the curriculum.
Session 1: Android Smartphone Introduction
Session 2: ADLC(Android Development Lifecycle)
Session 3: Android Setup and Installation
Session 4: Basic Android Application
Session 5: Android Fundamentals
Android Definition
Android Architecture
Internal working of Android Applications on underlying OS
Session 6: Activity
Activity Lifecycle
Fragments
Loaders
Tasks and Back Stack
Session 7: Android Application Manifest File
Session 8: Intent Filters
Session 9: User Interface
View Hierarchy
Layout Managers
Buttons
Text Fields
Checkboxes
Radio Buttons
Toggle Buttons
Spinners
Pickers
Adapters
ListView
GridView
Gallery
Tabs
Dialogs
Notifications
Menu
WebView
Styles and Themes
Search
Drag and Drop
Custom Components
Session 10: Android Design
Session 11: Handling Configuration
Session 12: Resource Types
Session 13: Android Animation
View Animation
Tween Animation
Frame animation
Property Animation
Session 14: Persistent data Storage
Shared Preference
Preference Screen
Sqlite Database
Session 15: Managing Long Running Processes
UI Thread
Handlers and Loopers
Causes of ANR issue and its solution
Session 16: Services
Service Lifecycle
Unbound Service
Bound Service
Session 17: Broadcast Receivers
Session 18: Content Providers
Session 19: Web Services
Http Networking
Json Parsing
Xml Parsing
Session 20: Google Maps
Session 21: Android Tools
Session 22: Publishing your App on Google market
4> java training:-We provide best java training in jodhpur, wscube tech one of the best result oriented java training company in jodhpur ,its offers best practically, experimental knowledge by 5+ year experience in real time project.we provide basic and advance level of java training with live project with 100%job placement assistance with top industries.
Session 1 : JAVA INTRODUCTION
WHAT IS JAVA
HISTORY OF JAVA
FEATURES OF JAVA
HELLO JAVA PROGRAM
PROGRAM INTERNAL
JDK
JRE AND JVM INTERNAL DETAILS OF JVM
VARIABLE AND DATA TYPE UNICODE SYSTEM
OPERATORS
JAVA PROGRAMS
Session 2 : JAVA OOPS CONCEPT
ADVANTAGE OF OOPS,OBJECT AND CLASS
METHOD OVERLOADING
CONSTRUCTOR
STATIC KEYWORD
THIS KEYWORD
INHERITANCE METHOD
OVERRIDING
COVARIANT RETURN TYPE
SUPER KEYWORD INSTANCE INITIALIZER BLOCK
FINAL KEYWORD
RUNTIME POLYMORPHISM
DYNAMIC BINDING
INSTANCE OF OPERATOR ABSTRACT CLASS
INTERFACE ABSTRACT VS INTERFACE PACKAGE ACCESS ODIFIERS
ENCAPSULATION
OBJECT CLASS
JAVA ARRAY
Session 3 : JAVA STRING
WHAT IS STRING
IMMUTABLE STRING
STRING COMPARISON
STRING CONCATENATION
SUBSTRING METHODS OF STRING CLASS
STRINGBUFFER CLASS
STRINGBUILDER CLASS
STRING VS STRINGBUFFER
STRINGBUFFER VS BUILDER
CREATING IMMUTABLE CLASS
TOSTRING METHOD STRINGTOKENIZER CLASS
Session 4 : EXCEPTION HANDLING
WHAT IS EXCEPTION
TRY AND CATCH BLOCK
MULTIPLE CATCH BLOCK
NESTED TRY
FINALLY BLOCK
THROW KEYWORD
EXCEPTION PROPAGATION
THROWS KEYWORD
THROW VS THROWS
FINAL VS FINALLY VS FINALIZE
EXCEPTION HANDLING WITH METHOD OVERRIDING
Session 5 : JAVA INNER CLASS
WHAT IS INNER CLASS
MEMBER INNER CLASS
ANONYMOUS INNER CLASS
LOCAL INNER CLASS
STATIC NESTED CLASS
NESTED INTERFACE
Session 6 : JAVA MULTITHREADING
WHAT IS MULTITHREADING
LIFE CYCLE OF A THREAD
CREATING THREAD
THREAD SCHEDULER
SLEEPING A THREAD
START A THREAD TWICE
CALLING RUN() METHOD JOINING A THREAD
NAMING A THREAD
THREAD PRIORITY
DAEMON THREAD
THREAD POOL
THREAD GROUP
SHUTDOWNHOOK PERFORMING MULTIPLE TASK
GARBAGE COLLECTION
RUNTIME CLASS
Session 7 : JAVA SYNCHRONIZATION
SYNCHRONIZATION IN JAVA
SYNCHRONIZED BLOCK
STATIC SYNCHRONIZATION
DEADLOCK IN JAVA
INTER-THREAD COMMUNICATION
INTERRUPTING THREAD
Session 8 : JAVA APPLET
APPLET BASICS
GRAPHICS IN APPLET
DISPLAYING IMAGE IN APPLET
ANIMATION IN APPLET
EVENT HANDLING IN APPLET
JAPPLET CLASS
PAINTING IN APPLET
DIGITAL CLOCK IN APPLET
ANALOG CLOCK IN APPLET
PARAMETER IN APPLET
APPLET COMMUNICATION
JAVA AWT BASICS
EVENT HANDLING
Session 9 : JAVA I/O
INPUT AND OUTPUT
FILE OUTPUT & INPUT
BYTEARRAYOUTPUTSTREAM
SEQUENCEINPUTSTREAM
BUFFERED OUTPUT & INPUT
FILEWRITER & FILEREADER
CHARARRAYWRITER
INPUT BY BUFFEREDREADER
INPUT BY CONSOLE
INPUT BY SCANNER
PRINTSTREAM CLASS
COMPRESS UNCOMPRESS FILE
PIPED INPUT & OUTPUT
Session 10 : JAVA SWING
BASICS OF SWING
JBUTTON CLASS
JRADIOBUTTON CLASS
JTEXTAREA CLASS
JCOMBOBOX CLASS
JTABLE CLASS
JCOLORCHOOSER CLASS
JPROGRESSBAR CLASS
JSLIDER CLASS
DIGITAL WATCH GRAPHICS IN SWING
DISPLAYING IMAGE
EDIT MENU FOR NOTEPAD
OPEN DIALOG BOX
JAVA LAYOUTMANAGER
Session 11 : JAVA JDBC and Online XML Data Parsing
Database Management System
Database Manipulations
Sqlite Database integration in Java Project
XML Parsing Online
Session 12 : Java Projects
NOTEPAD
PUZZLE GAME
PIC PUZZLE GAME
TIC TAC TOE GAME
Crystal App
Age Puzzle
BMI Calculator
KBC Game Tourist App
Meditation App
Contact App
Weather App
POI App
Currency Convertor
5>Python training:Wscube tech provides python training in jodhpur .we train the students from basic level to advanced concepts with a real-time environment.we are the best python training company in jodhpur.
Session 1 : Introduction
About Python
Installation Process
Python 2 vs Python 3
Basic program run
Compiler
IDLE User Interface
Other IDLE for Python
Session 2: Types and Operations
Python Object Types
Session 3 : Numeric Type
Numeric Basic Type
Numbers in action
Other Numeric Types
Session 4 : String Fundamentals
Unicode
String in Action
String Basic
String Methods
String Formatting Expressions
String Formatting Methods Calls
Session 5 : List and Dictionaries
List
Dictionaries
Session 6 : Tuples, Files, and Everything Else
Tuples
Files
Session 7 : Introduction Python Statements
Python’s Statements
Session 8 : Assignments, Expression, and Prints
Assignments Statements
Expression Statements
Print Operation
Session 9 : If Tests and Syntax Rules
If-statements
Python Syntax Revisited
Truth Values and Boolean Tests
The If/else ternary Expression
The if/else Ternary Expression
Session 10 : while and for loops
while Loops
break, continue, pass , and the Loop else
for Loops
Loop Coding Techniques
Session 11 : Function and Generators
Function Basic
Scopes
Arguments
Modules
Package
Session 12 : Classes and OOP
OOP: The Big Picture
Class Coding Basics
Session 13 : File Handling
Open file in python
Close file in python
Write file in python
Renaming and deleting file in python
Python file object method
Package
Session 14 : Function Basic
Why use Function?
Coding function
A First Example: Definitions and Calls
A Second Example : Intersecting Sequences
Session 15 :Linear List Manipulation
Understand data structures
Learn Searching Techniques in a list
Learn Sorting a list
Understand a stack and a queue
Perform Insertion and Deletion operations on stacks and queues
6>wordpress training:We will start with wordpress building blocks and installation and follow it with the theory of content management.we will then learn the major building blocks of the wordpress admin panel.the next unit will teach you about posts,pages and forums.and in last we done about themes which makes your site looks professional and give it the design you like.
Session 1: WordPress Hosting and installation options
CMS Introduction
Setting up Web Hosting
Introduction to PHP
Registering a Domain Name
Downloading and Installing WordPress on your Web Space
Session 2: WordPress Templates
Adding a pre-existing site template to WordPress
Creating and adding your own site template to WordPress
Note - this is an overview of templates - for in-depth coverage we offer an Advanced WordPress Course
Session 3: Configuring WordPress Setup Opt
When and How to Upgrade Wordpress
Managing User Roles and Permissions
Managing Spam with Akismet
Session 4: Adding WordPress Plugins
Downloading and Installing plugins
Activating Plugins
Guide to the most useful WordPress plugins
Session 5: Adding Content
Posts vs Pages
Adding Content to Posts & Pages
Using Categories
Using Tags
Managing User Comments
Session 6: Managing Media in WordPress
Uploading Images
Basic and Advanced Image Formatting
Adding Video
Adding Audio
Managing the Media Library
Session 7: Live Wordpress Project
Project Discussion
Requirements analysis of Project
Project code Execution
Project Testing
7>laravel training:Wscube tech jodhpur provide popular and most important MVC frameworks ,laravel using laravel training you can create web application with speed and easily.and before start training we done the basic introduction on framework.
Session 1 : Introduction
Overview of laravel
Download and Install laravel
Application Structure of laravel
Session 2 : Laravel Basics
Basic Routing in laravel
Basic Response in laravel
Understanding Views in laravel
Static Website in laravel
Session 3 : Laravel Functions
Defining A Layout
Extending A Layout
Components & Slots
Displaying Data
Session 4: Control Structures
If Statements
Loops
The Loop Variable
Comments
Session 5: Laravel Advanced Concepts
Intallation Packages
Routing
Middelware
Controllers
Forms Creating by laravel
Managing Sessions And Using Session Variables
Creating A Session And Registering Session Variables
Destroying A Session
Laravel - Working With Database
Session 6: SQL And Performing Queries
Inserting Records
Editing And Deleting Records
Retrieving Specific Columns
Filtering Records With A WHERE Clause
Sorting Records And Eliminating Duplicates
Limiting Results
Ajax
Sending Emails
Social Media Login
Session 7: Live Project
8>industrial automation engineer training :Automation is all about reducing human intervention .sometime it is employed to reduce human drudgery (e.g. crane,domestic,washing machine),sometime for better quality & production (e.g. CNC machine).some products can not be manufactured without automated machine (e.g. toothbrush,plastic,bucket,plastic pipe etc).
To replace a human being ,an automation system also needs to have a brain,hands,legs,muscles,eyes,nose.
Session 1:Introduction to Automaton
What is Automation
Components of Automation
Typical Structure of Automation
History & Need of Industrial Automation
Hardware & Software of Automation
Leading Manufacturers
Areas of Application
Role of Automation Engineer
Career & Scope in Industrial Automation
Session 2: PLC (Programmable Logic Controller)
Digital Electronics Basics
What is Control?
How does Information Flow
What is Logic?
Which Logic Control System and Why?
What is PLC (Programmable Logic Controller)
History of PLC
Types of PLC
Basic PLC Parts
Optional Interfaces
Architecture of PLC
Application and Advantage of PLCs
Introduction of PLC Networking (RS-232,485,422 & DH 485, Ethernet etc)
Sourcing and Sinking concept
Introduction of Various Field Devices
Wiring Different Field Devices to PLC
Programming Language of a PLC
PLC memory Organization
Data, Memory & Addressing
Data files in PLC Programming
PLC Scan Cycle
Description of a Logic Gates
Communication between PLC & PC
Monitoring Programs & Uploading, Downloading
Introduction of Instructions
Introduction to Ladder Programming
Session 3: Programming Of PLC (Ladder Logics)
How to use Gates, Relay Logic in ladder logic
Addressing of Inputs/Outputs & Memory bit
Math’s Instruction ADD, SUB, MUL, DIV etc.
Logical Gates AND, ANI, OR, ORI, EXOR, NOT etc.
MOV, SET, RST, CMP, INC, DEC, MVM, BSR, BSL etc.
How to Programming using Timer & Counter
SQC, SQO, SQL, etc.
Session 4:Advance Instruction in PLC
Jump and label instruction.
SBR and JSR instruction.
What is Forcing of I/O
Monitoring & Modifying Data table values
Programming on real time applications
How to troubleshoot & Fault detection in PLC
Interfacing many type sensors with PLC
Interfacing with RLC for switching
PLC & Excel communication
Session 5: SCADA
Introduction to SCADA Software
How to Create new SCADA Project
Industrial SCADA Designing
What is Tag & how to use
Dynamic Process Mimic
Real Time & Historical Trend
Various type of related properties
Summary & Historical Alarms
How to create Alarms & Event
Security and Recipe Management
How to use properties like Sizing, Blinking, Filling, Analog Entry, Movement of Objects, Visibility etc.
What is DDE Communication
Scripts like Window, Key, Condition & Application
Developing Various SCADA Applications
SCADA – Excel Communication
PLC – SCADA Communication
Session 6:Electrical and Panel Design
Concept of earthling, grounding & neutral
Study and use of Digital Multimeter
Concept of voltmeter & Ammeter connection
Definition of panel
Different Types of panel
Relay & contactor wiring
SMPS(Switch mode power supply)
Different type protection for panel
Application MCB/MCCB
Different Instruments used in panel (Pushbuttons, indicators, hooters etc)
Different type of symbols using in panel
Maintains & Troubleshooting of panel
Study of live distribution panel
Session 7: Industrial Instrumentation
Definition of Instrumentation.
Different Types of instruments
What is Sensors & Types
What is Transducers & Types
Transmitter & Receivers circuits
Analog I/O & Digital I/O
Different type sensors wiring with PLC
Industrial Application of Instrumentation
Flow Sensors & meters
Different type of Valves wiring
Proximate / IR Sensors
Inductive /Metal detector
Session 8: Study of Project Documentation
Review of Piping & Instrumentation Diagram (P&ID)
Preparation of I/O list
Preparation of Bill Of Material (BOM)
Design the Functional Design Specification (FDS)
Preparing Operational Manuals (O & M)
Preparing SAT form
Preparing Panel Layout, Panel wiring and Module wiring in AutoCAD.
9> digital marketing training: The digital marketing training course designed to help you master the essential disciplines in digital marketing ,including search engine optimization,social media,pay-per-click,conversion optimization,web analytics,content marketing,email and mobile marketing.
Session 1: Introduction To Digital Marketing
What Is Marketing?
How We Do Marketing?
What Is Digital Marketing?
Benefits Of Digital Marketing
Comparing Digital And Traditional Marketing
Defining Marketing Goals
Session 2: Search Engine Optimization (SEO)
Introduction To Search Engine
What Is SEO?
Keyword Analysis
On-Page Optimization
Off-Page Optimization
Search Engine Algorithms
SEO Reporting
Session 3: Search Engine Marketing (SEM
Introduction To Paid Ad
Display Advertising
Google Shopping Ads
Remarketing In AdWords
Session 4: Social Media Optimization (SMO)
Role Of Social Media In Digital Marketing
Which Social Media Platform To Use?
Social Media Platforms – Facebook, Twitter, LinkedIn, Instagram, YouTube And Google+
Audit Tools Of Social Media
Use Of Social Media Management Tools
Session 5: Social Media Marketing (SMM)
What Are Social Media Ads?
Difference Between Social Media And Search Engine Ads.
Displaying Ads- Facebook, Twitter, LinkedIn, Instagram & YouTube
Effective Ads To Lead Generation
Session 6: Web Analytics
What Is Analysis?
Pre-Analysis Report
Content Analysis
Site Audit Tools
Site Analysis Tools
Social Media Analysis Tool
Session 7: Email Marketing
What Is Email Marketing
Why EMail Marketing Is Necessary?G
How Email Works?
Popular Email Marketing Software
Email Marketing Goals
Best Ways To Target Audience And Generate Leads
Introduction To Mail Chimp
Email Marketing Strategy
Improving ROI With A/B Testing
Session 8: Online Reputation Management (ORM)
What Is ORM?
Why ORM Is Important?
Understanding ORM Scenario
Different Ways To Create Positive Brand Image Online
Understanding Tools For Monitoring Online Reputation
Step By Step Guide To Overcome Negative Online Reputation
Session 9: Lead Generation
What Is Lead Generation
Lead Generations Steps
Best Way To Generate Lead
How To Generate Leads From – LinkedIn, Facebook, Twitter, Direct Mail, Blogs, Videos, Infographics, Webinar, Strong Branding, Media
Tips To Convert Leads To Business
Measure And Optimize
Session 10: Lead Generation
What Is Affiliate Marketing
How Affiliate Marketing Works
How To Find Affiliate Niche
Different Ways To Do Affiliate Marketing
Top Affiliate Marketing Networks
Methods To Generate And Convert Leads
Session 11: Content Marketing
What Is Content Marketing?
Introduction To Content Marketing
Objective Of Content Marketing
Content Marketing Strategy
How To Write Great Compelling Content
Keyword Research For Content Ideas
Unique Ways To Write Magnetic Headlines
Tools To Help Content Creation
How To Market The Same Content On Different Platforms
Session 12: Mobile App Optimization
App store optimization (App name, App description, logo, screenshots)
Searched position of app
Reviews and downloads
Organic promotions of app
Paid Promotion
Session 13: Google AdSense
What is Google AdSense
How it Work?
AdSense Guidelines
AdSense setup
AdSense insights
Website ideas for online earning
10> robotics training:The lectures will guide you to write your very own software for robotics and test it on a free state of the art cross-platform robot simulator.the first few course cover the very core topics that will be beneficial for building your foundational skills before moving onto more advanced topics.End the journey on a high note with the final project and loss of confidence in skills you earned throughout the journey.
Session 1: Robotics Introduction
Introduction
Definition
History
Robotics Terminology
Laws of Robotics
Why is Robotics needed
Robot control loop
Robotics Technology
Types of Robots
Advantage & Disadvantage
ples of Robot
Session 2: Basic Electronics for Robotics
LED
Resistor
Ohm’s Law
Capacitor
Transistor
Bread board
DC Motor
DPDT switch
Rainbow Wire & Power Switch
Integrated Circuit
IC holder & Static Precaution
555 Timer & LM 385
L293D
LM 7805 & Soldering kit
Soldering kit Description
Soldering Tips
Soldering Steps
Projects
Session 3: Electronic Projects
a. Manual Robotic Car
Basic LED glow Circuit
LED glow using push button
Fading an LED using potentiometer
Darkness activation system using LDR
Light Activation system using LDR
Transistor as a NOT gate
Transistor as a touch switch
LED blinking using 555 timer
Designing IR sensor on Breadboard
Designing Motor Driver on Breadboard
Designing IR sensor on Zero PCB
Designing Motor Driver on Zero PCB
Line Follower Robot
Session 4: Sensors
Introduction to sensors
Infrared & PIR Senso
TSOP & LDR
Ultrasonic & Motion Sensors
Session 5: Arduino
a. What is Arduino
Different Arduino Boards
Arduino Shield
Introduction to Roboduino
Giving Power to your board
Arduino Software
Installing FTDI Drivers
Board & Port Selection
Port Identification – Windows
Your First Program
Steps to Remember
Session 6: Getting Practical
Robot Assembly
Connecting Wires & Motor cable
Battery Jack & USB cable
DC motor & Battery arrangement
Session 7: Programming
Basic Structure of program
Syntax for programming
Declaring Input & Output
Digital Read & Write
Sending High & Low Signals
Introducing Time Delay
Session 8: Arduino Projects
Introduction to basic shield
Multiple LED blinking
LED blinking using push button
Motor Control Using Push Button
Motor Control Using IR Sensor
Line Follower Robot
LED control using cell phone
Cell Phone Controlled Robot
Display text on LCD Display
Seven Segment Display
Session 8: Arduino Projects
Introduction to basic shield
Multiple LED blinking
LED blinking using push button
Motor Control Using Push Button
Motor Control Using IR Sensor
Line Follower Robot
LED control using cell phone
Cell Phone Controlled Robot
Display text on LCD Display
Seven Segment Display
11>SEO Training:SEO Search Engine Optimization helps search engines like google to find your site rank it better that million other sites uploaded on the web in answer to a query.with several permutation and combination related to the crawlers analyzing your site and ever changing terms and conditions of search engine in ranking a site,this program teaches you the tool and techniques to direct & increase the traffic of your website from search engines.
Session 1: Search engine Basics
Search Engines
Search Engines V/s Directories
Major Search Engines and Directories
How Search Engine Works
What is Search Engine Optimization
Page rank
Website Architecture
Website Designing Basics
Domain
Hosting
Session 2: Keyword Research and Analysis
Keyword Research
Competitor analysis
Finding appropriate Keywords
Target Segmentation
Session 3: On Page Optimization
Title
Description
Keywords
Anchor Texts
Header / Footer
Headings
Creating Robots File
Creating Sitemaps
Content Optimization
URL Renaming
HTML and CSS Validation
Canonical error Implementation
Keyword Density
Google Webmaster Tools
Google analytics and Tracking
Search Engine Submission
White Hat SEO
Black Hat SEO
Grey Hat SEO
Session 4: Off Page Optimization
Directory
Blogs
Bookmarking
Articles
Video Submissions
Press Releases
Classifieds
Forums
Link Building
DMOZ Listing
Google Maps
Favicons
QnA
Guest Postings
Session 5: Latest Seo Techniques & Tools
Uploading and website management
Seo Tools
Social media and Link Building
Panda Update
Penguin Update
EMD Update
Seo after panda , Penguin and EMD Update
Contact detail :-
a> WsCube Tech
First Floor, Laxmi Tower, Bhaskar Circle, Ratanada
Jodhpur - Rajasthan - India (342001)
b>Branch Office
303, WZ-10, Bal Udhyan Road,
Uttam Nagar, New-Delhi-59
c>Contact Details
Mobile : +91-92696-98122 , 85610-89567
E-mail : [email protected]
1 note
·
View note
Text
𝗧𝗵𝗲 𝗨𝗹𝘁𝗶𝗺𝗮𝘁𝗲 𝗦𝗘𝗢 𝗖𝗵𝗲𝗰𝗸𝗹𝗶𝘀𝘁 for website: 𝗕𝗲𝘀𝘁 𝗦𝗘𝗢 Practice
SEO Checklist for All-
Set Up Google Search Console and Bing Webmaster Tools
Set Up Google Analytics
Install and Configure an SEO Plugin (If You’re Using WordPress)
Generate and Submit a Sitemap
Create a Robots.txt File
Check Search Console for Manual Actions
Make Sure That Google Can Actually Index Your Website
How to Improve Organic CTR Website – SEO Ranking Tips
𝗞𝗲𝘆𝘄𝗼𝗿𝗱𝘀 𝗰𝗵𝗲𝗰𝗸𝗹𝗶𝘀𝘁
8. Identify Your Competitors
9. Find Your Main “Money” Keywords
10. Find Long-Tail Keyword Variations
11. Create a Keyword Map
12. Analyze the Intent of Pages That Rank
13. Identify Questions That Are Being Asked
14. Understand How Difficult It Is to Rank for Your Target Keywords
List of Common SEO onpage Mistake on website
𝗧𝗲𝗰𝗵𝗻𝗶𝗰𝗮𝗹 𝗦𝗘𝗢 𝗖𝗵𝗲𝗰𝗸𝗹𝗶𝘀𝘁:
15. Make Sure You Are Using HTTPS
16. Check for Duplicate Versions of Your Site in Google’s Index
17. Find and Fix Crawl Errors 18. Improve Your Site Speed
19. Fix Broken Internal and Outbound Links 20. Find and Fix HTTP Links on HTTPS Pages
21. Make Sure That Your Website Is Mobile-Friendly 22. Use an SEO-Friendly URL Structure
23. Add Structured Data
24. Check the Page Depth of Your Site
25. Check Temporary 302 Redirects
26. Find and Fix Redirect Chains and Loops
𝗢𝗻-𝗣𝗮𝗴𝗲 𝗦𝗘𝗢 𝗮𝗻𝗱 𝗖𝗼𝗻𝘁𝗲𝗻𝘁 𝗖𝗵𝗲𝗰𝗸𝗹𝗶𝘀𝘁
27. Find and Fix Duplicate, Missing, and Truncated Title Tags
28. Find and Fix Duplicate and Missing Meta Descriptions
29. Find and Fix Multiple H1 Tags
30. Improve Title Tags, Meta Tags, and Page Content
31. Run a Content Audit and Prune Content
32. Ensure Images Use Alt Tags
33. Improve Internal Linking
34. Find and Fix Keyword Cannibalization Issues
35. Find and Fix Orphaned Site Pages
36. Ensure Your Site’s Content Up to Date
𝗢𝗳𝗳-𝗣𝗮𝗴𝗲 𝗦𝗘𝗢 𝗖𝗵𝗲𝗰𝗸𝗹𝗶𝘀𝘁
37. Analyze Your Competitor’s Link Profile
38. Conduct a Link Intersect Analysis
39. Turn Unlinked Mentions Into Links
40. Find New Link Building Opportunities
41. Set Up and Optimize Google Business.
Most Common SEO onpage Mistakes on website
SEO Guide: Easy link building strategies to get high Quality BackLinks
How to start Digital Marketing, SEO Course online for beginners
Top 10 SEO Success Factors to Rank High in SERP -2021
0 notes
Text
9 Most Common WordPress Errors and How to Fix Them
9 Most Common WordPress Errors and How to Fix Them
WordPress Errors : In its sixteen years of its existence, WordPress has empowered many people to start their website, and business online. That’s a pretty impressive achievement and proof of the platform’s abilities. Several people use this platform in different circumstances and for various purposes, things won’t always go smoothly and users will run into issues on the way. Also using WordPress…

View On WordPress
0 notes
Text
Common Errors In WordPress And How To Handle Them

WordPress is one of the most popular CMS platforms to build websites. It is easy to use and customize according to user requirements. Creating a WordPress website and putting it online with basic configuration is an easy job for the beginners. It demands numbers of free themes and WordPress plugins to set up personal and business website easily. But still, there are a few errors users will run into when using WordPress. If you want to build a WordPress based website, then consult top Web Development Company Denver, CO to get the best results.
The “White Screen of Death”
This blank screen with no information is a reference to the infamous Blue Screen of Death used for windows but it’s for the websites. It is annoying as its Windows counterpart.
It may affect both Front-End and the admin panel, or just specific portions of the install.
According to WordPress, it can be triggered by both PHP errors and database errors. This condition may require dissimilar actions and steps because it can be hard to track down what is the issue behind it.
Suggested actions
First, confirm it, whether it happened just after you installed a plugin? Or change themes?
Is the WSOD affecting only a specific page? Or something more? Understand the scale of it. If all your websites are displaying a White Screen of Death, the problem can be on the web hosting server
If neither of the above solution works, put WP into debug mode with the line of code in wp-congig.php. From false, switch it to true and update the file over your server and start debugging.
Deactivate all plugins and reactivate them one by one, to find out if there a specific one is causing it.
If you can’t access the admin panel, deactivate the plugins via FTP.
Rollback the theme to the default WordPress Twenty Sixteen Theme.
WordPress admins: use the WP_Debug feature and increase the Memory allocated to PHP.
Reinstall WordPress as a last measure.
You can consult the best website development company to handle and remove all the errors.
Error 500
“Internal Server Error” or “500 Internal Server Error.” is the most confusing and irritating error. Mainly this error triggers when something went wrong or the server is unable to find out where the major problem lies. The issue with a theme’s function and plugins are usually responsible for it.
Suggested Actions:
Check the .htaccess file, as most of the time error occurs due to it. You can contact it via FTP and temporarily remove it and always keep its back up too. Visiting Settings → Permalinks will generate a new .htaccess file.
Deactivate all plugins and reboot them one by one, to find out if there a specific one is causing it.
Re-upload the wp-admin and wp-includes folders from a fresh install of WordPress.
For advanced users: try increasing the Memory allocated to PHP.
404 not Found Error
One of the most common issues of misconfigured websites, the 404 error has been an old enemy of web admins since the beginning of the internet. However, the most common among them is corrupted .htaccess file. It tends to affect the Front-End versions of individual pages that means the content is in the server but is not being reached. Possible causes include not setting up the permalinks properly or if a rule missing in the WordPress’ URL router’s cache.
Suggested Actions
To refresh it edit and update the page.
Change the permalink and make sure to update mentions to it.
Fix WordPress’ rules by installing the free Rewrite Rules Inspector plugin and performing the “Flush rules” action.
Error in Data Connection
Just as the message states, for some reason the server can’t access the database.There are various reasons why that may happen, but the most likely is that the user somehow altered the database login credentials or you use wrong database credentials (DB host, DB username, DB password.
Suggested Actions
Check the wp-config.php file by accessing it via FTP. Make sure that the following information is correct: Database name, Database username, Database password, and Database host.
If these values are correct, reset your MySQL password manually.
Are these solutions failing to resolve these issues, then it’s best to contact your host, as the server might be down.
If you are getting the same messages for back and front end, then you can try the following code.
Maintenance Error
This message pops-up during updates and can become an issue if it persists even after the process is finished. It’s one of those especially problematic WordPress errors because it affects both the Back-End and the Front-End, impeding users to access your website.
The message is triggered by the file .maintenance, which is located in the website base folder.
This issue usually is caused by interrupting updates. That’s because WordPress sets the website in maintenance mode during updates and, for some reason, it didn’t get to the point where the change was reverted.
Suggested Actions
First, make sure your WordPress website must be updated.
Access the server via FTP and delete the .maintenance file.\
Check for any errors in the search.php and index.php template files.
Memory Exhausted Error
When you encounter memory exhausted error you see the error message like ‘Fatal error: memory size exhausted. It often happens when you use by default memory size limit.
Suggested Actions
To resolve this error, you have to add the following code to the primary PHP tag of your WordPress configuration file.
White Space Error
Sometimes, instead of buttons you just see white spaces in the WordPress visual editor. Most of the time, it is due to a tiny error which you can fix quickly.
Suggested Action
Go to your admin panel and check if JavaScript is working correctly.
Check if small MCE files are not corrupted or missing.
Sometimes, this error can be resolved by clearing the browser cache. If these solutions are not working, add the code given below into your WordPress configuration php file just after the opening tag.
Define(‘CONCATENATE_SCRIPTS’, false);
Image Uploading Issues
If you are experiencing the broken image issue on site, most probably, it is because of an incorrect directory or file permission in a WordPress installation.
Suggested Action
Fix it using the FTP client such as FileZilla. Just access your site using FTP, and change the permissions of your image directory.
Login Pages Redirecting
You try to log into to your site, but instead of accessing your dashboard, you are redirected to the login page. It could be issued with the incorrect values for home URL or site URL fields.
Suggested Action
The best and simple solution for it is clear the cache & cookies and restart your browser.
The Syntax error
This error usually occurs when you try to add code snippets to your WordPress website but incorrectly miss something. It can be anything such as syntax, one extra comma, bracket, etc.
Suggested Actions
If you are not sure where the exact problem is you can use the following debugging tools to debug the code.
JS Fiddle
Debug Mode
JS Bin
Cloud 9
Sidebar Error
It is one of the most irritating errors in WordPress that is directly associated with the appearance of your site. CSS or HTML errors can be the primary culprits for this error. There is a possibility that you have forgotten to close HTML or CSS tags.
Suggested Actions
You are using a custom theme, the problem with float property or width ratio can be responsible as well. Make sure you have set a correct ratio for your custom theme.
Failed Auto-updating Error
WordPress now comes with an auto-update feature that takes care of security, minor bugs and such like things. The feature is a pure genius at work. It’s great, but sometimes it fails. Considering the auto-update feature does not require any human input, how do you tell when the update fails? You will see one of the following:
A PHP error message
A blank white screen (Also known as the white screen of death – WSOD)
A warning that says the update failed
Suggested Actions
Update your WordPress website manually.
If you don’t know where to start, please check out this Updating WordPress – Manual Update post at WordPress Codex.
Final Thoughts
Although WordPress is easy to use, sometimes, it’s difficult to handle its errors. With millions of websites using it in thousands of different server setups and an infinite combination of themes and plugins, things are bound to go wrong from time to time. By following above mentioned 12 solutions these errors can be resolved. If you have no idea about this field, consult the website designing company for the best possible solutions.
0 notes
Text
10 Social Media Fails to Avoid in 2020
Chances are you’ve witnessed a social media fail sometime in the past year. It usually results from a sense of urgency, or a miscommunication that ignores common sense, all for the sake of gaining attention.
It’s true: Follow just a bit of poorly-advised posting on social media, and you, too, can create your very own brand fail in a matter of minutes.

Many brands are over-concerned with posting frequency and speed, and not concerned enough with tactics that ensure quality and proper context. A single spur-of-the-moment tweet can cause irreparable damage. And even after it’s deleted, the examples below show that content on social media never truly dies — so make sure you have a plan in place that establishes clear boundaries and best practices.
As proof, here are ten of the worst social media fails you might ever come across.
11 Social Media Fails to Avoid
1. Chase’s Poem About Financial Woes
In 2019, Chase posted a #MondayMotivation tweet that aimed to encourage audiences to save money. However, it came off like the bank was teasing its audiences for bad spending habits.

Source
Then, the situation got worse for Chase when presidential candidate Elizabeth Warren tweeted in reply.
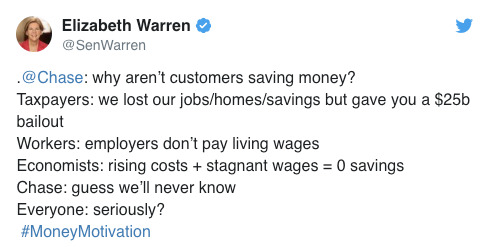
Source
2. IHOP’s April Fools Rebranding
Leading up to April Fools Day 2018, IHOP announced on social media that it was rebranding from the International House of Pancakes (IHOP) to the International House of Burgers (IHOB).
For 60 pancakin’ years, we’ve been IHOP. Now, we’re flippin’ our name to IHOb. Find out what it could b on 6.11.18. #IHOb pic.twitter.com/evSxKV3QmT
— IHOP (@IHOP) June 4, 2018
People began tweeting criticisms for the brand while also making fun of the name. Even though the joke aimed to gain attention, it seemed like the reaction was pretty mixed and confused.
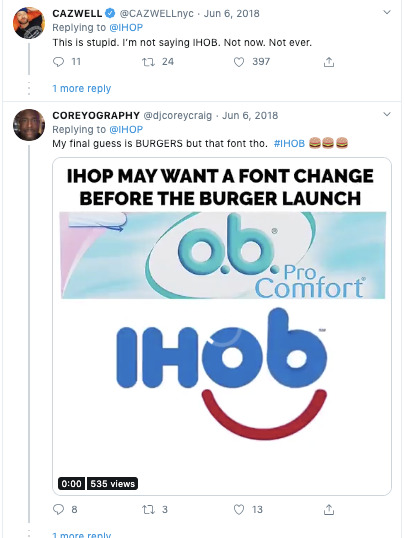
Because almost everyone knew IHOP was up to something, the joke fell flat despite its major online chatter.
3. EA Posts the Most Downvoted Reddit Comment in History
A few years ago, Reddit gamers were discussing a pricing issue on a subreddit related to the EA game they were playing. These gamers felt like they had to spend more money on a game they’d already purchased to get to new levels. At this point, in an effort to do damage control, EA wrote a PR-like response to one of the Redditors explaining and standing by the pricing of the game.
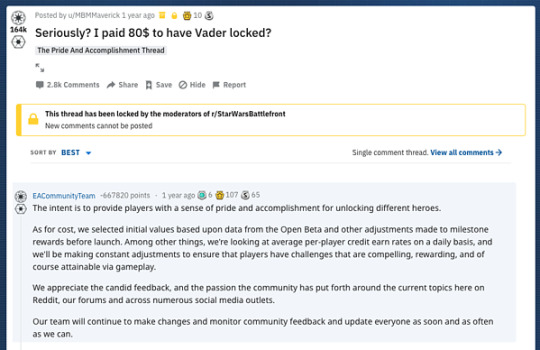
Redditors, who were more interested in solutions rather than excuses quickly downvoted the item. It soon was sent to the bottom of this subreddit becoming the most downvoted comment in Reddit history.
4. Massachusetts’ Bay Transit Authority Asks Audiences to Post “What They Love About It”
On Valentine’s Day this year, the MBTA launched a contest asking Twitter audiences to tweet a 60-second video about something they loved about MBTA. Those who entered the contest could win a round-trip JetBlue flight for two.

At this point in time, the MBTA has dealt with major criticism related to fair increases and ongoing rail construction. Twitter users that enjoyed complaining about the MBTA swarmed to this tweet about a number of sarcastic replies stating what they “loved” about the system. Here’s one great example:

5. Rhode Island or Iceland?
Good intentions fell flat for the Rhode Island Commerce Corporation in 2016, when it made one grave error in a $5 million promotional video — and used footage not of the great state itself, but instead, of Iceland.
The mistake went viral and gained far more attention than an Iceland-free version of the promotion would have, but it wasn’t exactly the type of publicity we imagine the bureau of tourism was hoping for.
Thanks to the social media skills of Rhode Island Governor Gina Raimondo, you can enjoy your very own private viewing of this social media fail.
Help tell Rhode Island’s story by sharing our new brand video #weareRI https://t.co/alIIcZ2DIghttps://t.co/qh3YtF0q0s
— Gina Raimondo (@GovRaimondo) March 29, 2016
6. Amazon Offers 10-cent Discount on PlayStation
In 2015, Amazon created #PrimeDay as its own corporate version of a Cyber Monday. Unfortunately, at that point, many of the discounts and offerings didn’t quite live up to consumer expectations — and the hashtag went viral for all the wrong reasons.
One kicker came when Amazon offered a whopping $0.10 discount on the Sony PlayStation 4 Console. It didn’t take long for #PrimeDayFail to start trending on Twitter.
Damn been waiting for the PS4 to go down 10 cents

#AmazonPrimeDay pic.twitter.com/eIiThMX9IT
— lupe (@cherryyyybomb) July 15, 2015
7. Apple’s #bendgate
Any time a brand winds up with a trending hashtag that includes the word “gate” in it, you know there’s trouble.
In 2014, Apple released the iPhone 6 with great fanfare, with one of the most aggressively highlighted features being that the phone wouldn’t bend under pressure in, say, your back pocket.
In a video that now has more than 69 million views, Unbox Therapy squashed Apple’s claims by demonstrating how easy it was to bend the iPhone 6. Once the damage was done there was no going back. A war of words promptly took place between avid Apple fans and detractors, garnering even more attention on social media.
8. Greggs’ Turns a Fail into a Win
Robots aren’t always smarter. In 2014, a Google bot mistakenly attributed an offensive slogan to U.K.-based bakery, Greggs. Hilarity — to some, at least, ensued when Greggs’ Digital Brand Manager, Neil Knowles, turned a potential brand disaster into a monumental win.
Thanks to the clever back-and-forth between Knowles and the Google team, and the massive publicity garnered by the exchange, Google’s original error wound up being one of the best things to ever happen to Greggs.
Hey @GoogleUK, fix it and they’re yours!!! #FixGreggs pic.twitter.com/d5Ub7qtrLG
— Greggs (@GreggsOfficial) August 19, 2014
9. Coca-Cola vs. Russia and Ukraine
If you’re going to create a huge promotion that displays a giant map of Russia, it’s generally a good idea to make sure that map is accurate. Or, better yet: When in doubt, don’t show a map.
Coca-Cola received massive backlash from Russian citizens when it posted a promotional branded image made to look like a map of Russia — which left out Crimea. In response, many consumers took to Twitter to post images of themselved pouring Coke into their toilets, leaving a trending impression.
Then, in response to the backlash, Coca-Cola published an updated map that included Crimea — which was promptly bombarded by outcries from Ukrainian citizens, due to tensions resulting from Russia’s annexation of Crimea in 2014.
Lesson learned: Don’t publish original content that’s inaccurate, and has the potential to be highly (and globally) controversial.

Source: The Guardian
10. A Giraffe for Ghana Tweet from Delta
Sometimes, all it takes to avoid a social media fail is a simple Google search.
During the 2014 World Cup game between the USA and Ghana, Delta sent out a congratulatory tweet to the U.S. soccer team. The tweet included an image of the Statue of Liberty with a “2” representing the U.S. score, and a giraffe with a “1” that was meant to represent team Ghana’s score.
There was one tall problem: Ghana doesn’t have giraffes. Of course, Twitter users jumped all over that one.
PHOTO: Delta Airlines thinks there are giraffes in Ghana. There aren’t. http://t.co/9VsWsCfQSe pic.twitter.com/pGMJ6p0ljA
— theScore (@theScore) June 17, 2014
Just remember: It’s always best to take extra time to conduct some easy research, and avoid social media gaffes — no pun intended — like this one.
Avoiding Social Media Disasters
You might have noticed a pattern in some of the “fail” examples. Twitter is not to be trifled with. Once something goes viral it lives on forever. The best way to avoid a social media brand fail is to establish a meticulous social media management approach. This allows you to control the types of content you post and the messaging your brand communicates with.
Regardless of how small your audience is or how innocent something might seem, there’s always a reason to quality-check before posting.
Editor’s Note: This post was originally published in September 2017 but was updated for comprehensiveness in February 2020.

Source link
Tags: 10, 2020, Avoid, fails, media, Social
from WordPress https://ift.tt/2yCJ7qi via IFTTT
0 notes
Photo

Jess Works as a Virtual Assistant
Travel Jobs
Are you good with computers, following instructions, and social media? You might be the perfect fit to work as a virtual assistant making money online remotely.
Today, my friend (and my own VA) Jess shares her experience becoming a virutal assistant, along with tips for how to find jobs while traveling. Here’s Jess:
The Best Travel Jobs
Hi guys! My name is Jess, and I work as Matt’s virtual assistant for this blog.
After traveling around the world full time for 9-months, my savings were starting to run out, and I was determined to find a travel job that would allow me to earn an income on the road.
I was already “living the dream”, now I just needed to figure out how to afford that dream!
After many trials and errors, I finally figured out how to make extra money traveling the world while working as a virtual assistant (VA).
In this article, I’m going to share how to start working as a virtual assistant, where to find virtual assistant jobs online, what skills are important to know, and tips for working remotely.
Searching For A Travel-Friendly Job
I remember the moment I decided to become a virtual assistant. I thought to myself “If other people are doing this, why can’t I?”.
It all started when I wrote out a list of all the skills I had picked up from studying and working in digital marketing, photography & video throughout the years prior to my gap year.
I knew what I was good at, but I had no idea how I was going to find someone who needed my skills.
Somewhere along the way, I figured it all out – and now it’s time for me to pass this wisdom onto you my young Padawan. ;-)
How to Work as a VA
What Is A Virtual Assistant?
This will change from client to client, but essentially a Virtual Assistant can do any digital task you need them to!
Most virtual assistants provide support to their clients by answering customer emails, updating websites, organizing files, bookkeeping, coordinating schedules, social media management, research, or even photo & video editing.
Basically, any small task that your client doesn’t want to do or doesn’t have time for. Freeing up valuable time that can be used on his or her primary business objectives.
In modern times, the need for an executive assistant to work in the same physical office space as their clients has reduced dramatically with the power of the internet, online tools, and new software.
Virtual Assistant Duties & Tasks
Virtual assistants can work as executive assistants, administrative assistants, or personal assistants depending on the client. Tasks may include things like:
Email Management
Answering customer support emails, highlighting promising business opportunities for the client to follow up on, declining unattractive offers, clearing out spam messages, or putting together a monthly newsletter.
Social Media Management
Scheduling posts on social media accounts like Facebook, Pinterest, Instagram, and YouTube. Designing graphics to use. Crafting descriptions. Researching hashtags. Maybe even responding to comments, updating profiles, and more.
Website Management
Formatting, editing, drafting, and scheduling blog posts on WordPress or another CMS (Content Management System) for the client’s website. Moderating the comments section. Fixing broken links and other general website maintenance tasks.
Administrative Tasks
Managing a client’s calendar, setting schedules, booking travel arrangements, creating spreadsheets, answering phone calls, etc.
Computer skills are also very important, as is knowledge of certain common software programs like:
Word Processors (Microsoft Word, Google Documents)
Spreadsheets (Excel, Google Sheets)
Blogging Platforms (WordPress)
Image Editors (Adobe Photoshop, Canva)
Social Media Tools (Tailwind, Buffer)
Just Another Day at the Office!
My Typical Day Working As Matt’s VA
While I’m going to share what my day looks like, there are all kinds of variations to this. Because virtual assistants can do all sorts of different tasks.
9 AM: Email Management Rise and shine! Time to check in on Slack (our team collaboration tool for organizing tasks, sending files and chatting about projects) to see if there’s anything to add to my to-do list for the week.
Next, I respond to and organize emails as well as approve blog comments — which can start to pile up overnight.
Matt receives a lot of similar questions & comments via email, so we have some standard replies for saving time. I save them as drafts and Matt adds his own personalizations before hitting “send”.
10 AM: Content Research & Blog Post Formatting I review Matt’s upcoming blog content, maybe do some extra research, or format unfinished blog posts so they’re ready to publish.
We are constantly working to improve Expert Vagabond content, updating older blog posts with more relevant information, plus adding maps or additional imagery to enhance the reader experience.
12 PM: Social Media Management Over the past few months, I’ve worked on creating Matt’s Pinterest ‘brand’, to ensure that there is a consistent look and feel between all of his pins. Creating some eye-catching pins using his images.
Once the Pinterest images are ready to go, it’s time to open up Tailwind to schedule the pins to go out for the next week. I create, source and schedule 15 – 20 pins per day.
Matt recently decided to try out Flipboard as another platform for sourcing and sharing content, so I usually spend 30-minutes updating our online Flipboard ‘magazines’ for the week.
Benefits Of Working As A Virtual Assistant
1. Work From Anywhere In The World
For me, this cancels out ALL of the disadvantages of VA work. I found out about this position when I was traveling through Asia earlier this year.
My bank account was telling me it was time to go home, but I wasn’t ready to stop traveling yet.
Having the opportunity to work from anywhere gave me the freedom to live life on my own terms. I can work from home, from a coffee shop, from a different city, or even a foreign country!
2. Cut Costs On Your Commute
When I worked in a typical office in Dublin, I would spend €11 and 2.5 hours on my commute every day.
Working from home allows me to save €220 every month – that’s €2,640 every year. That’s the price of a new camera or an incredible holiday abroad. I’ll take that over commuting any day!
3. Set Your Own Hours
If working the 9 – 5 grind works for you, stick at it! But if not, how about finding a job that allows you to work at a time that suits you.
Not much a morning person? Do the late shift. Not much of a night owl either? Not a problem, working from 11am to 7pm solves that problem. This is the kind of flexibility you just don’t find in a typical office environment.
4. Spend More Time With Your Family
What would you do if someone gave you an extra 2.5 hours in your day? I spend mine with the people I love, doing the things I used to have to save for the weekends.
Coffee Shops & Coworking Spots
The Downside Of Virtual Assistant Jobs
1. Loneliness
If you are thinking of getting into the digital nomad world, you’re going to have to get used to the idea of being alone.
There’s no one sitting beside you to support you or even just have a little chat with over lunch. If this doesn’t sound like your cup of tea, you should look into co-working spaces or networking events that you can go to in the evenings to get some human interaction in your day.
2. Distractions
I’m learning how to master this slowly but surely…
When there is no one looking over your shoulder all day, making sure you are focused on the task at hand, it is easy to become distracted by anything and everything!
You have to remember that you will only get paid for the hours you actually complete, not the 40 minutes you spend daydreaming out the window.
3. Self Discipline
Tying in nicely with the last point, self-discipline is a skill. Technically, you are your own boss now, so you have to make sure that you get the task done on time.
If you lack in self-discipline, you will lag in productivity. Set yourself boundaries, time frames and rules – then stick to them.
How Much Money Can You Earn?
Virtual assistants can usually make between $10 to $35 an hour with a median hourly rate of about $16. It will really depend on your skills, qualifications, and experience level.
If you’re just doing data entry, the pay might not be that great.
But if you’ve built up some basic graphic design skills, understand WordPress, know how to edit videos and photography, have in-depth experience with social media platforms, or other specialized knowledge, you can earn more.
Where To Find Virtual Assistant Jobs
If you’re ready to start making extra money on the side with a virtual assistant business, here are a few places to get started.
Freelancer Websites
FlexJobs
Upwork
People Per Hour
Social Media
Let your family and friends know you’re looking for a virtual assistant job by posting it on social media. Networking is a powerful tool. You may be surprised who knows someone that may be able to help you up with a job.
In fact, this is how I got my job! By posting on social media that I was looking for VA work.
Reach Out To Potential Clients
I’m sure you follow some professional bloggers, YouTube video creators, or social media influencers who you’d love to work with. It doesn’t hurt to send them all a quick message via email offering your services.
Be friendly, don’t be pushy, and if they aren’t hiring — maybe they know someone who is?
Tips For Landing Your First VA Position
Step 1: Work On Your Skills
The first step is to define the skills that you can use as a Virtual Assistant. Not sure if you have the right skills for the job? No problem!
Put some hours aside every week to learn skills and within a few months, you will be ready to put your new knowledge to the test.
There are millions of Youtube videos you can watch that will teach you how to run a successful social media campaign, manage calendar appointments, edit video on Final Cut Pro, create social media images using Adobe Photoshop and more.
You can also sign up to Skillshare (2 months free with that link!) to get unlimited access to over 23,000 classes.
This is exactly what I did to improve my organizational skills, digital marketing, video editing and photography before I started to look for jobs online.
Step 2: Find The Right Industry
For me, I knew that I wanted to work in the travel industry so that immediately narrowed down my options.
A lot of people go straight to the internet to search for a job. I decided to start my job search using the “networking” route by telling everyone I knew what I wanted to do.
I told my family and friends “I’m looking for a Virtual Assisting role in the travel industry. If you know someone who might be able to help me, could you give them my details?”
Then I put the message out to my connections on Facebook and Instagram.
Within a week, a friend of mine posted that Matt from ExpertVagabond.com was looking for a virtual assistant! Moral of the story – put it out into the world, and the world will often support you.
Step 3: Create A CV & Cover Letter
Throw away that boring Microsoft Word CV that you created when you were 16 in computer class! It’s time for a modern upgrade.
My go-to tool for CV creation is Canva.com. Not only does it have a tonne of templates for you to use, but you can also customize them to really showcase your top skills and highlight the many reasons why someone should hire you.
Don’t be afraid to add a little bit of personality to your CV. Keep in mind that your potential employer is probably sifting through a hundred CV’s, so you want them to open yours and say “Ooooh, what’s this?”. Leave them feeling intrigued.
Please remember that your CV should only be 1 – 2 pages long and your cover letter should be 2 – 3 paragraphs maximum. Employers usually don’t have a lot of time to look at them, so you need to present the information as concisely as possible.
Step 4: Interview Prep
Now that you have nailed the CV & Cover Letter, it’s time to prepare for the interview stage.
It is almost 100% guaranteed that they are going to ask you to tell them more about yourself, so make sure to have a little elevator speech worked out in advance.
Remember you don’t have to solely focus on the business side of life. Give them an insight into your hobbies, where you get inspiration from and how your life has lead you to this new role.
This is your moment to show them exactly why you are perfect for their virtual assistant position, so take the time to discuss your skills, your experience, your education (even if it is just from Youtube and Skillshare!).
They will love to hear that you are constantly learning and improving your knowledge of the key skills needed for the role.
ALWAYS have 2 – 3 questions prepared to ask them at the end of the interview. If you don’t, it can look like you are not interested in finding out more about them or their business.
If they have already answered all of your questions throughout the interview, you can tell them the question you wanted to ask, and thank them for already answering it in so much detail.
Step 5: Go Above & Beyond
If you want to really knock their socks off, why not create an example of the work you will create for them.
Show them your social media image designs, or write out a sample travel blog post to show them how serious you are about taking these tasks off their hands.
Not only will you stand out from the crowd, but it will instantly build trust that you can get the job done.
In the past, I’ve created video CV’s for clients who have a background in Youtube and have even created a brand new CV in the style of my favorite book for a position to work with the book’s author.
You have to do whatever it takes to stand out from the hundreds of other candidates.
The truth is there are many advantages and disadvantages to this type of job, but if you can master the art of virtual assisting, the world is your oyster!
It takes dedication, drive and an enormous amount of self-discipline, but it is definitely a dream job that will give you the freedom to live life on your own terms (and travel if you want to).
If you are attempting to find a VA job at the moment, just remember that the first client is the hardest. If you can land that first client, the next 50 clients should be no problem.
So keep on trying, keep improving your skills, and don’t stop learning until you’re living it up swinging from a hammock somewhere with your laptop in one hand and a cocktail in the other! ★
BIO
Jess Glynn is the author of The Gap Year Guru and has worked in digital marketing for over 5 years, specializing in Social Media and Content Creation. In 2017, she decided to quit her job and write about her travels through Brazil, Japan, Thailand, Malaysia and the Philippines for 9 months. Follow her on Instagram, YouTube, and Twitter!
Virtual Assistant Job Resources
Remote Job Listing Websites
FlexJobs.com
Guavabean Facebook Group
Remote.co
Freelancer.com
Useful Tools & Software For VAs
Canva
Slack
Trello
WordPress
Ultimate Travel-Friendly Job Guide.
Enjoy This Post? Pin It!
READ MORE DIGITAL NOMAD ARTICLES
How To Find Online Translation Jobs Working On Sailing Yachts How I Make Money While Traveling Side Income Ideas: Earning Money From Home
Have any questions for Jess about working as a virtual assistant or landing your first job? Drop her a message in the comments below!
This is a post from The Expert Vagabond adventure blog.
#><div#DCEFF5;border-color:f8fcfd;color:333333;border-radius:3px;-moz-border-radius:3px;-webkit-border-radius:3px;#c6d7dc;border-radius:3px;-moz-border-radius:3px;-webkit-border-radius:3px;>For
0 notes
Text
How to Remove the Date from WordPress URLs
Do you want to remove the date from your WordPress URLs?
WordPress comes with an SEO friendly URL structure. This includes several link formats including one that adds dates to your WordPress post URLs.
In this article, we will show you how to easily remove the date from your WordPress URLs.
Why Dates Appear in WordPress URLs?
By default, WordPress uses a non human-readable link structure for post and page URLs which looks like this:
https://example.com/?p=123
It uses post ID in the URL which does not look very good or meaningful.
However, WordPress also allows you to easily change this to more meaningful and SEO friendly URLs. It gives you a bunch of options to choose from under Settings » Permalinks page.
Choosing the ‘Month and name’ or ‘Day and name’ options will add the date parameters to your WordPress URLs. They will then look like this:
Day and name: https://example.com/2020/09/03/sample-post/ Month and name: https://example.com/2020/09/sample-post/
These URLs are better than the default ugly URLs. They are still SEO friendly as well. However, they are unnecessarily lengthy and the dates make your articles look old.
That’s why a lot of users want to switch to just ‘Post name’ URL structure which will remove the date and just use the post slug keyword in the URL.
Name: https://example.com/sample-post/
It is shorter, meaningful, SEO friendly, and doesn’t look dated as time passes.
Things You Should Consider before Removing Date from WordPress URLs
If you are starting a new WordPress blog and haven’t launched it yet, then it is safe to remove the date from WordPress URLs.
However, if your website has been around for some time, then you will need to keep the following things in mind.
Changing the URL structure may result in 404 errors for your users and search engines. This means you may see warnings and errors in your Google Search Console reports.
Your search engine rankings may also get affected as the link backs to your old articles will now lead to 404 errors.
Both of these issues can be fixed by setting up redirects, and we will show you how to do that later in this article.
Changing the URL structure will also reset your social share counts. Unfortunately, most social share count services do not track the redirected URLs and will reset share count for them.
Removing Date from WordPress URLs
First, you need to create a complete WordPress backup of your website. This will allow you to restore your website to an earlier stage in case things don’t work out as you expected.
After that, you need to visit the Settings » Permalinks page and choose ‘Name’ as your permalink option.
Don’t forget to click on the ‘Save Changes’ button to store your changes.
WordPress will now remove the date from your WordPress URLs and start using the name-based URL structure.
Setting up Redirects to Preserve SEO Rankings
Now that you have removed the date from your WordPress URLs. You need to set up proper redirects.
Redirects will send users to the updated URLs without showing a 404 error. This will also help search engines understand that the old URLs are now moved to these new URLs.
First, you need to install and activate the Redirection plugin. For more details, see our step by step guide on how to install a WordPress plugin.
Upon activation, you need to visit Tools » Redirection page and click on the ‘Start setup’ button.
The plugin will then show you a couple of options. It can automatically detect and alert you if a posts URL is changed and keep a log of redirects. You can also leave both these options unchecked and simply click on the ‘Continue setup’ button.
The plugin will then run some tests and if everything looks good then you can click on the Finish setup button. After that, it will store plugin settings into the WordPress database.
Once finished, you will see the plugin’s settings page. From here, you need to click on the ‘Add New’ button at the top or scroll down to the ‘Add new redirection’ section.
You will see a form with Source and Target fields. ‘Source’ is the field where you’ll describe your old URL structure and ‘Target’ is the location of the new URL.
If you were using the ‘Day and name’ URLs, then you will enter the following values in the source and target fields:
Source: /(\d*)/(\d*)/(\d*)/([A-Za-z0-9-*]) Target: /$4
If you were using ‘Month and name’ URLs, then you’ll enter the following values:
Source: /(\d*)/(\d*)/([A-Za-z0-9-*]) Target: /$3
Don’t forget to select Regex and click on the ‘Add Redirect’ button to save your changes.
The plugin will now redirect users to your new name-based URLs.
We hope this article helped you learn how to easily remove the date from WordPress URLs. You may also want to see our guide on the most common WordPress errors and how to fix them as well as our collection of the best WordPress SEO plugins.
If you liked this article, then please subscribe to our YouTube Channel for WordPress video tutorials. You can also find us on Twitter and Facebook.
The post How to Remove the Date from WordPress URLs appeared first on WPBeginner.
from WPBeginner https://www.wpbeginner.com/wp-tutorials/how-to-remove-the-date-from-wordpress-urls/
0 notes
Text
How to teach an old blog new SEO tricks
30-second summary:
It’s common for organic search traffic to a website or old blog to decline over time.
While some of the factors causing that are outside the site owner’s control, part of the reason is likely related to problems that gradually build up on the site.
Obsolete content, broken links, and technical issues are among the correctable items that can help reverse declining search traffic.
Principal and senior digital marketing consultant at Webbiquity LLC, Tom Pick shares a nine-step process to identify and fix your old blog site’s problems and regain organic traffic growth.
Do you ever feel like Google has fallen out of love with your old blog or website? Sure, there’s still acknowledgment, but the spark is gone, and the (traffic) relationship is no longer growing? Fear not, there is hope. You can rekindle those rankings. Here’s what to do.
If you’ve been working in digital marketing or SEO for a while, you’ve likely run into this situation: a new website/blog is launched. It’s got great content, is well optimized, and is supported by social media efforts. Traffic is modest at first but grows quickly and dramatically.
And then at some point, growth slows, particularly from organic search. It may even fall back a bit. And then it sort of bumps along. You keep adding relevant, high-quality new content, but the needle barely moves. What’s happened?
It’s not uncommon for a site’s organic search traffic to decline over time, the “old blog” problem. This can be caused by technical issues, competitive changes, search engine algorithm updates, or even broad industry trends. As one example, the click-through rate on organic searches fell 13% to 47.4% between 2016 and 2019.
But it’s true that over time, an old blog can become the online equivalent of a hoarder house or an unkempt garden. It’s no longer neat and clean, but rather it’s a mess of obsolete content, 404 errors, broken links, and other online debris.
Fortunately, this can be fixed. Like cleaning out that garden, it will take some work, some knowledge, and the right tools thought the dirt and weeds, in this case, are purely digital.
Here’s a nine-step process to restore healthy search traffic growth to a mature blog.
1. Check for digital obstacles
Use Google Search Console (GSC) to verify there are no manual penalties, security issues, or other problems. Fix any serious issues discovered there first.
If your site isn’t already connected to GSC, log into your Google account, and add it. Then check both Manual Actions and Security Issues in the left menu.
2. Inventory all pages on the site
To get rid of the “junk” on the site/blog, start by generating a complete list of all URLs. You may be able to get by with a tool like XML-Sitemaps or the free version of Screaming Frog SEO Spider, but for larger sites (and if you are running into SEO stagnation issues, you’re likely working with a site that has at least several hundred pages) you may need to invest in a paid tool.
3. Use GA to identify winners and losers
Next, log in to Google Analytics (GA) for the site. Navigate to Behavior > Site Content > All Pages. In the upper-right of the screen, set the start and end dates for the report (for example, the last six months or one year). At the bottom-right of the screen, change the number of pages displayed to the maximum, as shown here:
At the upper-right of the screen, click Export then download the file in Excel or CSV format.
4. Compare the two lists
Pages that receive very little traffic are a concern, but comparing a complete list of pages to pageviews in GA enables you to identify the most serious problems: pages that have had no visits over the past six, 12, or whatever number of months you choose.
Clean up the list of pages you exported from GA to remove site search results, author pages, category pages, tags pages, etc. so that you are left only with the list of blog posts and their number of page views.
In the figure below, the column on the left is a list of all pages. On the right are pages, with their corresponding number of views, from GA. By sorting both lists alphabetically, you can identify pages from the “all pages” list that don’t show up on the list from GA–because they have had no visits over the chosen time period.
5. Revise any pages that are “renewable”
The next step is triage—what to do with those pages that get little or no traffic? Some posts are more timeless than others, and with a bit refreshing, can still provide value to readers and draw visitors to your blog.
For example, posts here about how to write an effective business blog, how to spread thought leadership content without blogging, and why every business needs to be on Twitter were originally written on the Webbiquity blog in 2010 but recently updated to reflect online changes and lessons learned over the past decade.
6. Delete obsolete pages and redirect them to winners
Other types of posts simply don’t age well. Those pieces about the best practices in SEO for 2011 or the must-know stats and facts about social media in 2013 are now best forgotten, much like the worst songs of the 70s. (Remember “Muskrat Love”? If not, consider yourself fortunate.)
Newsy posts also have a limited shelf life. Posts about how buyers and marketers are adapting to this COVID-19 era are popular right now. But once the pandemic has passed, no one will want to revisit those.
These posts can, however, attract a lot of backlinks in their prime. So take them down, but strategically redirect those URLs to similarly relevant but more up-to-date content.
7. Find and fix any broken outbound links on the site
It’s vital to perform step 6 before this one, so you don’t waste time fixing links in posts that will be taken down anyway.
Use a tool like Broken Link Checker to find broken or obsolete outbound links on your pages, then update or delete those links. This type of cleanup at least moderately improves SEO, while significantly improving the reader experience on your site.
8. Run Google speed test and mobile-friendly check
Page load speed and mobile performance are now among the top ranking factors for SEO.
Use Google’s PageSpeed Insights and Mobile-Friendly Test tools and follow their recommended guidelines to fix issues and improve your scores
For example, this site scores a 64 on the Google page load speed test–above average, but not great. Note that Google provides separate scores for mobile and desktop load speed. Scrolling down the page a bit, one of Google’s recommendations for improvement is to “Eliminate render-blocking resources”. Clicking the small arrow to the right of that suggestion exposes more detail. In this case, Google’s tool links to WordPress plugins which may help resolve the issue.
9. Put your best, most relevant CTAs on your top pages
Take another look at the list generated in step three above. Look closely at the top five-to-ten most-visited pages or posts on your site.
First, if these can be improved or updated in any way to make them even more valuable and appealing, do that. Second, make sure each of these pages has a highly relevant and compelling call to action. You’re attracting lots of visitors to these pages, which is great; now take the next step and apply the best options to get them to convert into sales or leads.
Popular CTAs include downloadable assets related to your content, such as ebooks, guides, or checklists. Or you try being more direct and asking the page visitor to contact you or schedule a demo. In any case, it’s also essential to use CTA best practices in order to compel readers to respond.
That’s it! Delete or revise your obsolete content, fix technical errors, regularly produce high-quality new content, and that mature, stagnant blog can quickly get back to 20%, 30%, or even higher year-over-year growth in organic search traffic.
Tom Pick is a digital marketing consultant who helps B2B clients improve their online visibility, increase brand awareness, and generate leads through SEO, social media, and content marketing. He’s the Editor of the Webbiquity b2b marketing blog and author of “The Ultimate Guide to Content Marketing Software.” You can find him on Twitter @TomPick.
The post How to teach an old blog new SEO tricks appeared first on Search Engine Watch.
from Digital Marketing News https://www.searchenginewatch.com/2020/08/27/how-to-teach-an-old-blog-new-seo-tricks/
0 notes
Text
Fintech - Startup WordPress Theme
New Post has been published on https://intramate.com/wordpress-themes/fintech-startup-wordpress-theme/
Fintech - Startup WordPress Theme
LIVE PREVIEWGet it now for only $59
Can I see the online documentation? You can view all of the theme’s documentation, including the install guide right here.
Do I get the images used on the demo site? No, these were sourced from shutterstock.com and cannot be distributed within the theme. It’s intended you use your own to put your own stamp on the design. For free images, check out the excellent unsplash.com
Does Fintech come with a page builder? Yes, it comes with WPBakery, the most popular drag-and-drop page builder plugin for WordPress that comes free with the theme. It allows you to build fully custom pages by mixing and matching the existing elements.
Can I use the theme on multiple sites with a single purchase? Nothing will stop you, but note that each license can be activated on one WordPress site at a time. You will get updates and support for the one you activate.
Why is Fintech right for you?
We’ve researched your industry – After spending many hours studying dozens of the best Fintech websites we wanted to create a best in class theme for Fintech and startups in the financial technology sector in general. The Fintech sector is exploding right now but there’s a real lack of quality themes for Fintech businesses – the Fintech fixes that!
Easy to use! – before we made themes for a living we bought them just like you. We grew tired and frustrated of themes that we’re impossible to figure out how to use. Our customers love how we setup our themes to be easy to manage and intuitive to figure out in minutes. Thousands of happy customers have told us we’re doing it right!
Setup in minutes! – you can quickly recreate a website similar to our demo site in minutes using our one click installer. Don’t waste hours reading manuals to get up and running – get your website built faster so you can start selling today.
Best in class, super fast code! – we take code quality very seriously. Our themes load like lightning which is so important for small businesses.
Optimized for SEO – Fintech is fully compatible with the leading SEO plugin on the market, Yoast SEO and passes Google’s Structured Data Testing Test Tool.
World class support! – when you do need help we’re here for you. Our customers rave about our world class support team.
Overview
WordPress 5+ Ready
100% focused on world class design best practices
Perfect design and features for any fintech startup or tech startups in general
Fully Responsive! Strong focus on the smartphone and tablet experience
Unlimited Color and Typography options
CommerceGurus Toolkit – our very own WordPress plugin included to enhance WordPress
Step by Step Video Guides
Detailed Documentation
Child theme friendly
5 Star Rated Elite ThemeForest Authors
World Class Support
Layout Features
Boxed or Full Width Layout
Mobile friendly and Retina-ready design
Sticky Header Option
WPBakery included worth $46!
Beautifully designed Shortcodes
Left, Right or no Sidebars on the News Template
Use Background Photos or patterns
Header Features
Adjust the height of the Logo and Header
Change the Colors to match your brand
Change the typography with loads of Theme Options
LayerSlider included worth $25!
Create Unlimited Sliders
Pages
Contact Page
About Page and beautiful pages to help attract world class people to work in your business
Solutions
Customer Stories
Left and Right Sidebar Options
Testimonials
EASY TO CUSTOMIZE
Background Photo and Pattern Uploader
Change the Colors to match your Brand
Show 2 Footers or just 1
Fully Customizable Design: set your Color and Font for each Typographic Selector
Built-in Google Fonts. Over 650 Web Fonts support with Preview
AND ALSO…
SEO Optimized HOT
Child Theme Support
Bootstrap 3 Grid
404 Error Page
Unlimited Contact forms with JS Validation HOT
Video Tutorials and Demo Data
One Click Demo Data Install
Installing the Fintech theme demo data takes just minutes allowing you to get up and running in no time at all. The sample images are not included in the theme due to copyright reasons and are replaced with grey placeholders.
Knowledge Base
Check out the Fintech Knowledge Base for common questions and answers.
Updating the theme
See the theme update guide here. Be sure and follow each step.
Changelog
17 Nov 2019 – V1.5.5 Changelog
- WPBakery 6.0.5 supported - LayerSlider 6.9.2 supported
22 May 2019 – V1.5.4 Changelog
- WPBakery 6.0.2 supported - LayerSlider 6.8.4 supported
2 March 2019 – V1.5.3 Changelog
- WPBakery 5.7 supported - LayerSlider 6.8.1 supported - Improved gallery styling
8 December 2018 – V1.5.1 Changelog
- Visual Composer/WPBakery 5.5.6 supported. Gutenberg compatibility.
8 November 2018 – V1.5 Changelog
- PHP 7.2 support - Visual Composer/WPBakery 5.5.5 supported - LayerSlider 6.7.6 supported - CommerceGurus Toolkit 1.8 - WooCommerce 3.5 compatibility
21 May 2018 – V1.4.3 Changelog
- LayerSlider 6.7.5 supported - Visual Composer/WPBakery 5.4.7 supported - Minor style tweaks File list admin/options-init.php | 10 +++--- functions.php | 12 +++---- inc/core/css/custom-css.php | 113 ++++++++++++++++++++++++++++++++++++++++++++++++++++++++++++++++ style.css | 2 +- 4 files changed, 125 insertions(+), 12 deletions(-)
12 January 2018 – V1.4.2 Changelog
- Visual Composer 5.4.5 support - LayerSlider 6.6.7 support - One Click Demo import rather than Radium - Minor tweaks File list css/commercegurus.css | 8 +- functions.php | 65 +- .../demo-files/content.xml | 7158 ++++++++++++++++++++ .../demo-files/index.php | 1 + .../demo-files/widgets.json | 1 + .../demo-files/widgets.wie | 1 + .../importer/parsers.php | 638 ++ .../importer/radium-importer.php | 518 ++ .../importer/wordpress-importer.php | 1086 +++ inc/radium-one-click-demo-install/init.php | 81 + inc/radium-one-click-demo-install/licence.txt | 367 + inc/radium-one-click-demo-install/readme.md | 30 + style.css
16 August 2017 – V1.4.1 Changelog
- Visual Composer 5.2.1 support - LayerSlider 6.5.7 support - CommerceGurus Toolkit 1.7.0 support - WooCommerce 3.1 support File list css/commercegurus.css | 17 +++ functions.php | 293 +++++++++++++++++++++++++------------------------- style.css | 2 +- 3 files changed, 164 insertions(+), 148 deletions(-)
7 April 2017 – V1.4.0 Changelog
- LayerSlider 6.2.2 support - Visual Composer 5.1 support - WooCommerce 3.0 support File list css/commercegurus.css | 36 +++++++++++++++++++++++++++--------- functions.php | 20 ++++++++++++-------- inc/template-tags.php | 10 ---------- style.css | 2 +- 4 files changed, 40 insertions(+), 28 deletions(-)
14 January 2017 – V1.3 Changelog
- LayerSlider 6.1.0 support - Visual Composer 5.0.1 support - CommerceGurus Toolkit 1.6.1 support - Structured metadata improvements - Minor css updates and enhancements - Minor php improvements File list archive.php | 84 +++++++++++++++++++----- content-fullwidthpage.php | 5 +- content-page.php | 4 ++ content-single.php | 5 +- css/commercegurus.css | 47 +++++++++---- functions.php | 66 ++++++++++--------- image.php | 2 +- inc/plugins/commercegurus-toolkit.zip | Bin 146990 -> 0 bytes inc/plugins/js_composer.zip | Bin 4491710 -> 0 bytes inc/plugins/layersliderwp-5.6.8.installable.zip | Bin 6202077 -> 0 bytes inc/template-tags.php | 2 +- style.css | 2 +-
2nd August 2016 – V1.2 Changelog
- New! Projects Post Type added - Fix for VC Post Grid - Minor CSS fixes File list admin/options-init.php | 28 +- css/commercegurus.css | 285 +- css/responsive.css | 28 +- functions.php | 12 - image.php | 18 +- inc/core/css/custom-css.php | 4 + .../demo-files/content.xml | 4625 ++++++++++++-------- search.php | 16 +- searchform.php | 2 +- single-project.php | 77 + style.css | 4 +- template-projects-landing.php | 141 + 12 files changed, 3486 insertions(+), 1754 deletions(-)
10th August 2016 – V1.2.1 Changelog
- Added back LayerSlider demo slides - Minor CSS fixes File list css/commercegurus.css | 5 +++- search.php | 64 ++++++++++++++++++++++++++++++++++++--------------- style.css | 4 ++-- 3 files changed, 51 insertions(+), 22 deletions(-)
2nd August 2016 – V1.2 Changelog
- New! Projects Post Type added - Fix for VC Post Grid - Minor CSS fixes File list admin/options-init.php | 28 +- css/commercegurus.css | 285 +- css/responsive.css | 28 +- functions.php | 12 - image.php | 18 +- inc/core/css/custom-css.php | 4 + .../demo-files/content.xml | 4625 ++++++++++++-------- search.php | 16 +- searchform.php | 2 +- single-project.php | 77 + style.css | 4 +- template-projects-landing.php | 141 + 12 files changed, 3486 insertions(+), 1754 deletions(-)
16th June 2016 – V1.1 Changelog
- WooCommerce 2.6 - Visual Composer 4.12 - minor improvements and fixes File list admin/options-init.php | 2 +- css/commercegurus.css | 169 +++++++++++++++++++++++++++++++++++++- css/responsive.css | 13 +++ customvc/vc_templates/vc_row.php | 13 ++- functions.php | 2 +- inc/core/functions/javascript.php | 5 +- inc/plugins/js_composer.zip | Bin 4442384 -> 4491710 bytes js/src/cond/livepreview.js | 2 + style.css | 2 +- 9 files changed, 200 insertions(+), 8 deletions(-)
LIVE PREVIEWGet it now for only $59
0 notes
Link
This is taken from a blog post I recently wrote, if you prefer better formatting, I'll drop the link at the bottom.------------------------------------------------------------------------------------It can be hard to get those conversions, so before you spend on fancy tools or invest too much time, check this list to see if there are some quick wins you can gain!First things first, get the right mindsetThis is something that every good digital marketer understands:Don't spend your time and effort trying to get your potential customers to understand your business.Spend the time making sure you understand them.Sounds obvious, and maybe a bit strange. I know.What I mean is, the crux to all marketing is relating to your customers.It's showing them that you know what they want, the problems they have, the pains they face, and how your product or service is the solution they need.You need to show them why they value and want what you already offer.They should instantly understand 'what's in it for them', and why they should believe that you're the answer they're looking for.Put simply, some examples:I don't need 'plumbing services'. I need someone to fix my leaking tap or cold shower.I don't need '20 years of car repair and maitenance', I need my buckled wheel changed.I don't need 'Architectural drawings using the latest techniques'. I just need help drawing my new home extension.This perspective may seem obviously important, but it's the key that we should always refer back to, to check if we're meeting the needs of our audiences.Okay, let's get going.Customer Benefits Are Clearly Noted - Preferably in Bullet PointsWhat's in it for me?That's what your website visitors are thinking.Their (our) attention spans are so short these days, you need to immediately get their attention with exactly the benefits they're looking for.Some generic examples of the benefits might be:Quick serviceEasy processAffordable pricingFast deliveryMoney-back guaranteeNext-day deliveryFree shippingTailored serviceBut, you do want to be specific to the problem where possible.So, if you were a plumber, it'd be:Get Your Leak Fixed in 1 Hour or LessNew Shower Units Installed Quick, Easy and for Affordable PricesWe Fix Most Blocked Drains in Less Than 30 MinutesFrom Leaks to Blockages to New Installations: Affordable, Friendly and EasyThe idea with most of these is that they all address common problems that are specific to the audience. Try to use the examples above with your own business, play around with them, and let me know how you get on with them!Your Headline is Value-Focused and EngagingMuch like your clearly-displayed benefits, you need to immediately grab attention with what the visitor values.Quickly and efficiently communicate the value of whatever you offer, so that visitors 'get it' right away, otherwise they might lose interest and continue scrolling through social media, or worse, through a list of your competitors.It might be cost-focused, such as:Your Ideal Garden is Closer. Grab 30% Off Your Next Garden Tool PurchaseLimited Offer: Your Case of Handpicked Wines 10% Off and Free ShippingSave Up to X on Your New Car - Get the Best Offers from DealersIt could also be more benefit-focused, for example:Get Clear, Soft Skin in 3 Days with ABC CreamKnock 10+ Seconds Off Your Mile With Our Running Training Program54 Recipes for a Healthier but Tasty Diet: Reach Your Transformation GoalsNow, I know, these examples are all made up, and some maybe a little far-fetched, but the point here is to consider why people should care, and tell them this right away.If you don't, you risk losing them entirely, if not just for now.Your Page Contains Social Proof and AccreditationsMost of us have heard of companies faking reviews on popular websites. This does happen, and we should be aware of it.However, if you have authentic reviews, oftentimes most people can spot they're genuine.So, flaunt them! If you're offering the best burger in your town and that one guy writes a rave review, share it with the world.A lot of people decide to make purchases or work with other businesses primarily due to trust-related factors, such as referrals.Having consistently good reviews online, that people can verify on their own too (not just cherry-picking the best ones for your website), is a huge bonus.So if you can integrate them into your page you should do it. If you don't have many (or any), ask satisfied customers to leave an honest review.Likewise, if you have industry or other relevant accreditations, add the badges or logos to your site.Many tradespeople are required to have certain credentials, and can get more to show their expertise. Potential customers are looking for these all the time, to make sure whoever they bring on meets standards.If you're not meeting standards, then that's definitely something to work on before this!Where Do I Sign Up?!If your offer, headline, benefits and social proof factors are all nicely put together, your target market should want to take some action.Whether it's leaving their contact details for a follow up, or clicking through to a checkout, you should make that process so easy they can't resist.Too often, people have tiny little text links, or buttons that don't stand out, or buttons with dull and generic text.So many call to actions are so hidden, people can't find them if they want to sign up!Don't be that person.Make your button big (within reason), make sure it stands out (e.g has a contrasting colour to its background), and make sure the text is actionable or personable.So instead of 'Submit' or 'Send Message' or 'Visit Checkout', try 'Claim Your 20% Discount' or 'Learn More About Your Workout Guide' or 'I Want Cheap Wine', respectively.Even if they may seem a little 'in your face' or lame, even this simple differentiation between you and the 99999+ other sites out there makes the whole process so much more engaging for visitors.There's nothing worse than a bored visitor to your offer page.Your Landing Page Messaging Has ContinuityThis comes up time and time again.Whether people are finding you through Google or Facebook, or even from Flyers or Print Advertising, your landing page headline and benefits need to tie in very closely to wherever they came from that made them land here.The offer, the benefits, even the product or service all need to match.You'd be surprised how many companies create a great looking advertising campaign, only for visitors to end up on the website that is half-broken on mobile and the page is a generic page such as your 'Services' page or your eCommerce shop product index.If you're advertising the latest technologies of your hairdryers that dry hair in two seconds, make sure visitors land on a page that showcases that, and primarily that.Sure, let people have a look around other pages if they choose, but the focus should be there.On the reverse, make sure you advertising campaign makes sense for the people you are reaching.So many times I've seen an interesting advert online, only to click it and find out 'This offer is not available in your country/region/town'.That's just annoying for the visitor, plus a waste of your advertising budget (much like men seeing TV ads for feminine products and vice versa - entirely wasted advertising spend).Get the Tech Right!If you're not technologically-minded, that's fine, but there's still a lot you can do to avoid technological errors on your website.Key things are oversized images. Don't upload raw camera photos at huge sizes. Most images don't need to be bigger than 1500 pixels squared these days on the web.If they must be so big, try an image compressor such as tinypng.com - I would even advise you use this for all images.Do a search for Google PageSpeed and plug your page in to see other suggestions on how to optimise your website. If using WordPress, there are plugins you can use to decrease load times.So that's speed, what else?Mobile will make or break you!Mobile is key today - making up at least 50% of most web traffic.So if your site loads with tiny text, or is super-slow on mobile networks, you must work on this. Every commonly-used template-built website these days is mobile-ready. If not, there's a ton of great resources out there to help you get moving.We're all guilty of it, if we can't scroll, swipe and zoom as we normally do on our mobile apps as we can on your website, we've quit and gone to the next thing.Security must meet modern standardsPrimarily, SSL Certificates. These keep websites with any kind of forms where customer data is stored, plus other elements, nice and secure.Many website hosts now offer these for free or at affordable prices, so get one installed; otherwise you get the dreaded 'Unsecured' badge on your site, which doesn't make you look trustworthy.Unfortunately, you may not even need one, but it's another important standard to adhere to in the current internet landscape.---------------------That's all for now. If you liked this post, please let me know and I can share more.If you have any questions, please feel free to comment and I'll respond.Original version with better formatting available here: https://jonht.com/9-ways-you-can-instantly-increase-online-sales-on-your-website-today/
0 notes
Text
How To Become A Virtual Assistant
Jess Works as a Virtual Assistant
Travel Jobs
Are you good with computers, following instructions, and social media? You might be the perfect fit to work as a virtual assistant making money online remotely.
Today, my friend (and my own VA) Jess shares her experience becoming a virutal assistant, along with tips for how to find jobs while traveling. Here’s Jess:
For more travel friendly job ideas, check out my ultimate guide: The Best Travel Jobs
Hi guys! My name is Jess, and I work as Matt’s virtual assistant for this blog.
After traveling around the world full time for 9-months, my savings were starting to run out, and I was determined to find a travel job that would allow me to earn an income on the road.
I was already “living the dream”, now I just needed to figure out how to afford that dream!
After many trials and errors, I finally figured out how to make extra money traveling the world while working as a virtual assistant (VA).
In this article, I’m going to share how to start working as a virtual assistant, where to find virtual assistant jobs online, what skills are important to know, and tips for working remotely.
Searching For A Travel-Friendly Job
I remember the moment I decided to become a virtual assistant. I thought to myself “If other people are doing this, why can’t I?”.
It all started when I wrote out a list of all the skills I had picked up from studying and working in digital marketing, photography & video throughout the years prior to my gap year.
I knew what I was good at, but I had no idea how I was going to find someone who needed my skills.
Somewhere along the way, I figured it all out – and now it’s time for me to pass this wisdom onto you my young Padawan. ;-)
How to Work as a VA
What Is A Virtual Assistant?
This will change from client to client, but essentially a Virtual Assistant can do any digital task you need them to!
Most virtual assistants provide support to their clients by answering customer emails, updating websites, organizing files, bookkeeping, coordinating schedules, social media management, research, or even photo & video editing.
Basically, any small task that your client doesn’t want to do or doesn’t have time for. Freeing up valuable time that can be used on his or her primary business objectives.
In modern times, the need for an executive assistant to work in the same physical office space as their clients has reduced dramatically with the power of the internet, online tools, and new software.
Virtual Assistant Duties & Tasks
Virtual assistants can work as executive assistants, administrative assistants, or personal assistants depending on the client. Tasks may include things like:
Email Management
Answering customer support emails, highlighting promising business opportunities for the client to follow up on, declining unattractive offers, clearing out spam messages, or putting together a monthly newsletter.
Social Media Management
Scheduling posts on social media accounts like Facebook, Pinterest, Instagram, and YouTube. Designing graphics to use. Crafting descriptions. Researching hashtags. Maybe even responding to comments, updating profiles, and more.
Website Management
Formatting, editing, drafting, and scheduling blog posts on WordPress or another CMS (Content Management System) for the client’s website. Moderating the comments section. Fixing broken links and other general website maintenance tasks.
Administrative Tasks
Managing a client’s calendar, setting schedules, booking travel arrangements, creating spreadsheets, answering phone calls, etc.
Computer skills are also very important, as is knowledge of certain common software programs like:
Word Processors (Microsoft Word, Google Documents)
Spreadsheets (Excel, Google Sheets)
Blogging Platforms (WordPress)
Image Editors (Adobe Photoshop, Canva)
Social Media Tools (Tailwind, Buffer)
Just Another Day at the Office!
My Typical Day Working As Matt’s VA
While I’m going to share what my day looks like, there are all kinds of variations to this. Because virtual assistants can do all sorts of different tasks.
9 AM: Email Management Rise and shine! Time to check in on Slack.com (our team collaboration tool for organizing tasks, sending files and chatting about projects) to see if there’s anything to add to my to-do list for the week.
Next, I respond to and organize emails as well as approve blog comments — which can start to pile up overnight.
Matt receives a lot of similar questions & comments via email, so we have some standard replies for saving time. I save them as drafts and Matt adds his own personalizations before hitting “send”.
10 AM: Content Research & Blog Post Formatting I review Matt’s upcoming blog content, maybe do some extra research, or format unfinished blog posts so they’re ready to publish.
We are constantly working to improve Expert Vagabond content, updating older blog posts with more relevant information, plus adding maps or additional imagery to enhance the reader experience.
12 PM: Social Media Management Over the past few months, I’ve worked on creating Matt’s Pinterest ‘brand’, to ensure that there is a consistent look and feel between all of his pins. Creating some eye-catching pins using his images.
Once the Pinterest images are ready to go, it’s time to open up Tailwind to schedule the pins to go out for the next week. I create, source and schedule 15 – 20 pins per day.
Matt recently decided to try out Flipboard as another platform for sourcing and sharing content, so I usually spend 30-minutes updating our online Flipboard ‘magazines’ for the week.
Benefits Of Working As A Virtual Assistant
1. Work From Anywhere In The World
For me, this cancels out ALL of the disadvantages of VA work. I found out about this position when I was traveling through Asia earlier this year.
My bank account was telling me it was time to go home, but I wasn’t ready to stop traveling yet.
Having the opportunity to work from anywhere gave me the freedom to live life on my own terms. I can work from home, from a coffee shop, from a different city, or even a foreign country!
2. Cut Costs On Your Commute
When I worked in a typical office in Dublin, I would spend €11 and 2.5 hours on my commute every day.
Working from home allows me to save €220 every month – that’s €2,640 every year. That’s the price of a new camera or an incredible holiday abroad. I’ll take that over commuting any day!
3. Set Your Own Hours
If working the 9 – 5 grind works for you, stick at it! But if not, how about finding a job that allows you to work at a time that suits you.
Not much a morning person? Do the late shift. Not much of a night owl either? Not a problem, working from 11am to 7pm solves that problem. This is the kind of flexibility you just don’t find in a typical office environment.
4. Spend More Time With Your Family
What would you do if someone gave you an extra 2.5 hours in your day? I spend mine with the people I love, doing the things I used to have to save for the weekends.
I Often Work from Coffee Shops
The Downside Of Virtual Assistant Jobs
1. Loneliness
If you are thinking of getting into the digital nomad world, you’re going to have to get used to the idea of being alone.
There’s no one sitting beside you to support you or even just have a little chat with over lunch. If this doesn’t sound like your cup of tea, you should look into co-working spaces or networking events that you can go to in the evenings to get some human interaction in your day.
2. Distractions
I’m learning how to master this slowly but surely…
When there is no one looking over your shoulder all day, making sure you are focused on the task at hand, it is easy to become distracted by anything and everything!
You have to remember that you will only get paid for the hours you actually complete, not the 40 minutes you spend daydreaming out the window.
3. Self Discipline
Tying in nicely with the last point, self-discipline is a skill. Technically, you are your own boss now, so you have to make sure that you get the task done on time.
If you lack in self-discipline, you will lag in productivity. Set yourself boundaries, time frames and rules – then stick to them.
How Much Money Can You Earn?
Virtual assistants can usually make between $10 to $35 an hour with a median hourly rate of about $16. It will really depend on your skills, qualifications, and experience level.
If you’re just doing data entry, the pay might not be that great.
But if you’ve built up some basic graphic design skills, understand WordPress, know how to edit videos and photography, have in-depth experience with social media platforms, or other specialized knowledge, you can earn more.
Where To Find Virtual Assistant Jobs
If you’re ready to start making extra money on the side with a virtual assistant business, here are a few places to get started.
Freelancer Websites
FlexJobs
Upwork
People Per Hour
Social Media
Let your family and friends know you’re looking for a virtual assistant job by posting it on social media. Networking is a powerful tool. You may be surprised who knows someone that may be able to help you up with a job.
In fact, this is how I got my job! By posting on social media that I was looking for VA work.
Reach Out To Potential Clients
I’m sure you follow some professional bloggers, YouTube video creators, or social media influencers who you’d love to work with. It doesn’t hurt to send them all a quick message via email offering your services.
Be friendly, don’t be pushy, and if they aren’t hiring — maybe they know someone who is?
Tips For Landing Your First VA Position
Step 1: Work On Your Skills
The first step is to define the skills that you can use as a Virtual Assistant. Not sure if you have the right skills for the job? No problem!
Put some hours aside every week to learn skills and within a few months, you will be ready to put your new knowledge to the test.
There are millions of Youtube videos you can watch that will teach you how to run a successful social media campaign, manage calendar appointments, edit video on Final Cut Pro, create social media images using Adobe Photoshop and more.
You can also sign up to Skillshare to get unlimited access to over 23,000 classes.
Click here to sign up for a 2-month free trial, which is exactly what I did to improve my organizational skills, digital marketing, video editing and photography before I started to look for jobs online.
Step 2: Find The Right Industry
For me, I knew that I wanted to work in the travel industry so that immediately narrowed down my options.
A lot of people go straight to the internet to search for a job. I decided to start my job search using the “networking” route by telling everyone I knew what I wanted to do.
I told my family and friends “I’m looking for a Virtual Assisting role in the travel industry. If you know someone who might be able to help me, could you give them my details?”
Then I put the message out to my connections on Facebook and Instagram.
Within a week, a friend of mine posted that Matt from ExpertVagabond.com was looking for a virtual assistant! Moral of the story – put it out into the world, and the world will often support you.
Step 3: Create A CV & Cover Letter
Throw away that boring Microsoft Word CV that you created when you were 16 in computer class! It’s time for a modern upgrade.
My go-to tool for CV creation is Canva.com. Not only does it have a tonne of templates for you to use, but you can also customize them to really showcase your top skills and highlight the many reasons why someone should hire you.
Don’t be afraid to add a little bit of personality to your CV. Keep in mind that your potential employer is probably sifting through a hundred CV’s, so you want them to open yours and say “Ooooh, what’s this?”. Leave them feeling intrigued.
Please remember that your CV should only be 1 – 2 pages long and your cover letter should be 2 – 3 paragraphs maximum. Employers usually don’t have a lot of time to look at them, so you need to present the information as concisely as possible.
Step 4: Interview Prep
Now that you have nailed the CV & Cover Letter, it’s time to prepare for the interview stage.
It is almost 100% guaranteed that they are going to ask you to tell them more about yourself, so make sure to have a little elevator speech worked out in advance.
Remember you don’t have to solely focus on the business side of life. Give them an insight into your hobbies, where you get inspiration from and how your life has lead you to this new role.
This is your moment to show them exactly why you are perfect for their virtual assistant position, so take the time to discuss your skills, your experience, your education (even if it is just from Youtube and Skillshare!).
They will love to hear that you are constantly learning and improving your knowledge of the key skills needed for the role.
ALWAYS have 2 – 3 questions prepared to ask them at the end of the interview. If you don’t, it can look like you are not interested in finding out more about them or their business.
If they have already answered all of your questions throughout the interview, you can tell them the question you wanted to ask, and thank them for already answering it in so much detail.
Step 5: Go Above & Beyond
If you want to really knock their socks off, why not create an example of the work you will create for them.
Show them your social media image designs, or write out a sample travel blog post to show them how serious you are about taking these tasks off their hands.
Not only will you stand out from the crowd, but it will instantly build trust that you can get the job done.
In the past, I’ve created video CV’s for clients who have a background in Youtube and have even created a brand new CV in the style of my favorite book for a position to work with the book’s author.
You have to do whatever it takes to stand out from the hundreds of other candidates.
The truth is there are many advantages and disadvantages to this type of job, but if you can master the art of virtual assisting, the world is your oyster!
It takes dedication, drive and an enormous amount of self-discipline, but it is definitely a dream job that will give you the freedom to live life on your own terms (and travel if you want to).
If you are attempting to find a VA job at the moment, just remember that the first client is the hardest. If you can land that first client, the next 50 clients should be no problem.
So keep on trying, keep improving your skills, and don’t stop learning until you’re living it up swinging from a hammock somewhere with your laptop in one hand and a cocktail in the other! ★
BIO
Jess Glynn is the author of The Gap Year Guru and has worked in digital marketing for over 5 years, specializing in Social Media and Content Creation. In 2017, she decided to quit her job and write about her travels through Brazil, Japan, Thailand, Malaysia and the Philippines for 9 months. Follow her on Instagram, YouTube, and Twitter!
Virtual Assistant Job Resources
Remote Job Listing Websites
FlexJobs.com
Guavabean Facebook Group
Remote.co
Freelancer.com
Useful Tools & Software For VAs
Canva
Slack
Trello
WordPress
For more ways to make money while traveling, check out my Ultimate Travel-Friendly Job Guide.
Enjoy This Post? Pin It!
READ MORE TRAVEL TIPS
How To Find Online Translation Jobs Working On Sailing Yachts How I Make Money While Traveling Side Income Ideas: Earning Money From Home
Have any questions for Jess about working as a virtual assistant or landing your first job? Drop her a message in the comments below!
This is a post from The Expert Vagabond adventure blog.
from Tips For Traveling https://expertvagabond.com/become-virtual-assistant/
0 notes
Text
Beginners Guide: 26 Most Common WordPress Mistakes to Avoid
When creating a WordPress website, everyone make mistakes. However each mistake is a learning opportunity that helps you grow.
Over the years, we have helped thousands of WordPress users start their websites and blogs. In setting up our own websites as well as helping others, we have learned to avoid some common WordPress mistakes.
It has helped us save time, money, and grow our business more effectively.
In this article, we will share those experiences with you, so you can avoid these common WordPress mistakes.
The goal is to help you learn from other people’s mistakes when making your own websites.
1. Choosing The Wrong Platform
The biggest mistake people make when starting out is choosing the wrong blogging platform. Basically, there are two types of WordPress. First, there is WordPress.com which is a blog hosting service, and then there is WordPress.org also which is the famous self-hosted WordPress platform that everyone loves.
You need to start with self-hosted WordPress.org because it gives you access to all the features you need out of the box.
To learn more see our article on WordPress.com vs WordPress.org with a side by side comparison of the two platforms.
2. Buying More than What You Need
To get started with a WordPress website, you need a domain name and WordPress hosting.
The challenge is that a lot of domain registrars try to upsell other services. This confuses the small business owners who are just starting out.
The add-on services may include privacy protection, extra email accounts, security services, and more.
You can skip all of these things and save money to spend on growing your business. If you later decide that you need those services, then you can always purchase them from your hosting company.
You also need to choose the right hosting plan for your website. For 90% of websites that are just starting out, a shared hosting account is quite enough to get you going.
We recommend using Bluehost. They are one of the biggest hosting companies in the world and officially recommended by WordPress.
They are offering WPBeginner users a discount on hosting + free domain and SSL certificate. Basically, you can get started for $2.75 per month.
→ Click Here to Claim This Exclusive Bluehost Offer ←
As your business grows, you can choose to upgrade your hosting plan or move to a managed WordPress hosting company.
For more details, see our guide on the cost of a WordPress website and how to save money when building your website.
3. Not Setting up Automated Backups
Each year billions of dollars worth of damages are caused by data loss. Almost every website on the internet is prone to accidents, theft, hacking attempts, and other disasters.
Your most powerful line of defense against these threats is automated backups. Without a backup, you could lose all your WordPress data, and it would be very difficult to recover it (sometimes even impossible).
We have seen many people lose their entire websites just because they didn’t have an up to date backup.
Setting up backups is extremely easy, and there are excellent WordPress backup plugins available in the market. Once you set up one of these backup plugins, they would automatically create backups for you.
The second part of this mistake is not storing backup files on a remote location. A lot of folks store their WordPress backups on their web hosting server. If they lose their website data, then they also lose the backups.
Make sure that you store your backups on cloud storage service like Google Drive, Dropbox, etc. Backup plugins like UpdraftPlus can automatically do that for you.
4. Not Setting up Google Analytics
If you want to grow your business with confidence, then you need to know how people find and use your website. That’s where Google Analytics can help.
We recommend using MonsterInsights, the most popular Google Analytics plugin for WordPress. It saves you time during setup, and shows you the stats that matter, right inside your WordPress dashboard.
If you don’t want MonsterInsights Pro, then there’s also a free version of MonsterInsights available that you can get started with.
5. Not Setting up a Contact Form
Not setting up a contact form is another easily avoidable mistake that many beginners make. Without a contact form, your website visitors will not be able to contact you, and this can cause you to lose significant opportunities.
You will see a contact page on almost every popular website. It is one of the most important pages every website need to have.
WordPress does not come with a built-in contact form, but there are a lot of great WordPress contact form plugins available that you can use.
We recommend using WPForms Lite which is the free version of the popular WPForms plugin that’s being used by over 2 million websites.
You can see our detailed instructions on how to create a contact form in WordPress.
6. Not Building an Email List
Did you know that more than 70% of people who visit your website will never come back again?
If you are not building your email list, then you are basically losing money with every website visitor that leaves your site. Converting website visitors into email subscribers allows you to bring back those users to your website.
To learn more about this topic, see our article on why building an email list is important.
You will need an email marketing service to set up your email list. We recommend using Constant Contact because they are one of the best email marketing companies on the market with a very beginner friendly platform.
For step by step instructions, see our complete tutorial on how to start an email newsletter.
7. Not Choosing The Right WordPress Theme
One of the biggest challenges WordPress beginners face is choosing the right design for their website.
With thousands of WordPress themes out there, an average beginner tries multiple themes before settling for the right one, and this process can even lead the user to rebuild their website multiple times.
To avoid this, we recommend choosing the right WordPress theme from the start and then stick to it.
This allows your website visitors to become familiar with your website, your brand, and its unique style. Consistency and continuity of your design makes a big impact on brand recognition and awareness.
We are often asked by readers, how to choose a theme that just works?
Well, when it comes to design we prefer simplicity over glitter. It has worked really well not just for us, but many successful online businesses.
You need to choose a great looking but simple WordPress theme that pays attention to the following items:
It must look equally good on all devices (desktop, mobile, and tablets).
It should be easy to customize and flexible to adapt to your needs.
It should work with popular plugins and WordPress page builders.
It should be optimized for performance and speed.
Now we understand that as a non-techy user, you may not be able to check all those things on your own. In that case, we recommend choosing a theme from a top commercial WordPress theme shop like StudioPress, Themify, or Astra Theme.
If you need more recommendations, then check out these theme showcases where we hand-picked the best WordPress themes in different categories.
Best WordPress blog themes
Best WordPress business themes
Best simple WordPress themes
Best multi-purpose WordPress themes
8. Ignoring WordPress Updates
We have seen many beginners and even experienced WordPress users who don’t install updates on their site. Many of them believe that doing so will cause errors and could break their site.
That’s not true.
You can easily and safely update WordPress without breaking your website. By not updating WordPress, you leave your website vulnerable to security breaches while using outdated software.
It’s not just WordPress, your WordPress theme and plugins also regularly release updates for bug fixes, security patches, and new features.
For more details, see our guide on how to safely update WordPress
9. Not Optimizing Your Website for SEO
A lot of WordPress users rely on their best guesses when it comes to promoting their websites. Some completely ignore SEO, while some do it half-heartedly.
SEO (Search Engine Optimization) helps you rank higher in search engines, so more users can find your website.
Search engines are the biggest source of traffic for most websites. SEO is crucial for the success of your online business.
We have a complete step by step WordPress SEO guide for beginners which will help you properly optimize your website for SEO.
10. Not Using Categories and Tags Properly
Another big mistake is not using categories and tags properly. Some users end up using categories where they should have used tags and vice-versa.
We have seen websites with dozens of categories and no tags at all. We have seen websites using hundreds of tags and no categories at all.
Basically, categories are your website’s table of contents. If your website was a file cabinet, categories would be its drawers.
On the other hand, tags are like the index page. If your website was a file cabinet, tags would be the labels on individual file folders.
For a more detailed explanation, see our guide on categories vs tags and how to use them properly in WordPress for maximum SEO advantage.
11. Not Using Posts and Pages Properly
Sometimes beginner WordPress users end up using posts to create important website pages. Similarly, some users end up using pages for articles when they should have used posts instead.
A lot of users realize their mistake after a while when their website becomes difficult to manage.
Basically, pages are for static pages that don’t change very often like about, contact, privacy policy, etc.
On the other hand, posts are for time-based content like news, updates, articles, and blogs.
Take a look at our complete guide about the difference between posts vs pages and what you can do with them.
12. Not Choosing The Right URL Structure (Permalinks)
Selecting the right URL settings (permalink structure) for your website is really important. Changing your URL structure later is not easy, and it can have a significant impact on your website traffic.
We recommend going to the Settings » Permalinks page in your WordPress admin area and choosing a URL structure with that shows your post name in the URL.
13. Ignoring Website Speed and Performance
Human attention span is dropping rapidly, and users want instant gratification. With faster internet connections, your users would find a few extra seconds of page load time to be extremely slow.
And it’s not just users, even search engines rank faster websites higher in their results. By ignoring website speed and performance you risk user experience as well as search rankings.
Which is why you need to make sure that your website loads fast. We have a step by step guide that will help you improve WordPress speed and performance without going too deep into the technical stuff.
14. Not Choosing The Right Plugins
The real power of WordPress comes with its plugins. There are thousands of free WordPress plugins that you can install with a few clicks.
However, not all plugins are good. In fact, some plugins are bad and could affect your website’s performance and security. Often users end up downloading plugins from unreliable sources that distribute hidden malware.
Here are a few things you need to keep in mind when choosing plugins:
Only install plugins from WordPress.org or WordPress companies with good reputation.
Look for plugin reviews and support forums because they are a good indicator of a plugin’s quality
Check trusted WordPress resources like WPBeginner for plugin recommendations
If you want some recommendations right now, then check out our list of must have WordPress plugins for all websites.
For more information, check out our guide on how to choose the best WordPress plugins for your website.
15. Ignoring WordPress Security Best Practices
Many users do not take any security measures to harden WordPress security. Some believe that their website is too small, and it will not be targeted by hackers.
Hackers target websites indiscriminately. For example, they could use your website to distribute malware, brute force attacks, steal data, and more.
By not securing your website, you can lose search rankings, your website data, and/or customer information. This could cost you a lot of money and headache.
You need to follow the security best practices and build layers of security around your WordPress site. It does not take too much time, and you don’t need any special skills to do that.
Simply follow our complete WordPress security guide with step by step instructions to protect your website.
16. Changing Website URL and Losing All Traffic
How many of you hated the first domain you registered and wanted to switch away from it when you got serious about blogging? Yup, it happens to all of us.
While you can change the website URL or domain name, it does have a significant SEO impact. What makes matters even worse is when you switch URLs without taking proper steps.
You need to set up proper redirects, inform Google about the change, and add the new domain to Google Search Console.
We have described all the steps in our guide on how to properly move WordPress to new domain.
17. Not Removing WordPress Demo Content
A lot of people don’t delete the default demo content added by a new WordPress install. This includes a sample page, a post titled ‘Hello World’, and a default comment.
Not removing this content allows search engines to crawl and index them. Now if you search for the text in demo content on Google, you’ll find hundreds of thousands of pages. That’s duplicate content and search engines penalize duplicate content as low-quality pages.
Similarly, many people don’t change the default WordPress tag line that says ‘Just another WordPress site’.
You need to delete all default content and the tag line, as they look unprofessional and create a bad impression.
18. Not Setting up Comment Moderation
Comment spam is annoying and can make your brand look bad. Many beginners have their blogs set up to automatically publish all new comments without moderation.
This means spam comments with links to malware and low-quality sites can go live on your website without your knowledge. This could damage your search rankings and your website’s reputation.
You need to always keep comment moderation turned on for all your WordPress sites. Simply go to Settings » Discussion page and check the box next to ‘A comment must be manually approved’ option.
After that, you need to make it part of your routine to check and approve comments on your website. For more tips, see our article on how to combat comment spam in WordPress.
19. Not Optimizing Your Images for Web
Images are essential in the making of a highly engaging website. However, they are also heavier in filesize than plain text.
If you are adding images to your website without optimizing them, then this would affect your website speed.
You need to make it a habit of saving your images as optimized for the web. You can use Photoshop, GIMP (free), or other online tools to reduce the image file size before uploading it.
For instructions, see our tutorial on how to save images optimized for the web.
20. Saving Unnecessary Code in Theme’s Functions File
Another common mistake that we often come across is when folks add too many code snippets in their theme’s functions.php file.
Functions file is designed to behave like a plugin, but it is not the ideal place for all types of code snippets. You will lose these modifications when you switch the theme. You may even forget that you added some code in there after a while.
We recommend only adding code in your theme’s functions file if the code is related to changing something with that particular theme.
For all other custom code, it is better to use a site-specific plugin or the code snippets plugin.
21. Getting Locked Out by Editing Functions File in WordPress Admin Area
Another annoying mistake that is quite common is when folks edit functions file inside the WordPress admin area.
By default, WordPress comes with a built-in code editor to edit theme and plugin files inside WordPress. Often beginners end up breaking their website when adding or removing code using those editors.
Even though WordPress added functionality to catch fatal errors and not save them. You could still lock yourself out and make your website inaccessible.
We recommend disabling theme and plugin editor in WordPress and use FTP to edit files in WordPress.
22. Not Setting Up Google Search Console
Data is really important when planning a strategy to grow your business and website. Many users make the mistake of not adding their WordPress site to Google Search Console for a long time.
This means they miss out important search data that could help them grow their website.
Google Search Console is a free tool provided by Google. It allows you to see how your website appears in search results and fix any search indexing problems quickly.
See our complete Google Search Console guide to see how you can use it to improve search rankings and grow your business.
23. Using Uncategorized as Default Category
A lot of folks leave Uncategorized as their default category. WordPress requires all posts to be filed under a category and when no category is selected, it automatically adds the post under default category.
Many times users forget to select a category for their post and hit the publish button which publishes that post in Uncategorized.
This mistakes can be easily avoided by choosing a proper default category in WordPress settings.
24. Not Using a Professional Branded Email Address
We have seen many folks sending us emails from their Gmail or Hotmail accounts while pitching for a business that already has a website.
Now, how do we know for sure that they are officially representing that company or website?
Similarly if you have a business, and you are still sending people business emails from a free email account, then people will have a hard time taking you seriously.
People do not have the time or skills to verify that you are the actual owner of that website or business.
This mistake is also easily avoidable. See our guide on how to easily get a professional business email address for free.
25. Leaving a Site Public While Working on It
People often leave under construction websites publicly accessible. This is not very professional and can harm your business.
A publicly accessible website can be automatically crawled and indexed by search engines anytime. Your competitors can find it and steal your ideas. Your customers can find it and see the unfinished website.
There is an easier solution to avoid this mistake. Simply put your website in maintenance mode and add a coming soon page to build anticipation.
26. Not Learning WordPress
WordPress is very easy to use even for non-technical users. This allows many users to keep running their websites without learning more about WordPress.
By doing so, you miss the opportunity to explore the incredibly helpful features of WordPress. Things that are very simple to implement but could transform your business.
Learning WordPress is quite easy, particularly when you already have a running WordPress site. Explore different sections of WordPress, try out new plugins, learn more about SEO, and email marketing.
WPBeginner is the largest free WordPress resource site for beginners with tons of awesome resources, videos, how-tos, step-by-step tutorials, and more.
Following are just some of the helpful resources you’ll find on WPBeginner (all of them are completely free).
WPBeginner Dictionary – The best place for beginners to start and familiarize themselves with the WordPress lingo
WPBeginner Videos – New to WordPress? Watch these 23 videos to master WordPress.
WPBeginner Blog – The central place for all our WordPress tutorials.
You can also subscribe to our YouTube Channel where we regularly share video tutorials to help you learn WordPress.
We hope this article helped you learn about common WordPress mistakes and how to easily avoid them. You may also want to see our tips on effective ways to increase your website traffic without spending too much money.
If you liked this article, then please subscribe to our YouTube Channel for WordPress video tutorials. You can also find us on Twitter and Facebook.
The post Beginners Guide: 26 Most Common WordPress Mistakes to Avoid appeared first on WPBeginner.
😉SiliconWebX | 🌐WPBeginner
0 notes
Text
12 WordPress and SEO Tips To Optimize Your Blog
SEO is always evolving, and Google and other search engines are constantly updating their algorithms.
WordPress helps a lot, but there are several things you need to know to optimize your blog.
Here are some tips to consider when you want to rank better on search engines.
1. Create Unique Content
Sometimes this counts more than page optimization. Your content must have absolutely no parts copied from other texts on the network. You can use tools like the Plagiarism Checker or Copiscape to make sure that your articles (even unintentionally) do not carry too similar phrases other posts outside your website.
2. Don’t Be Obsessed With Ranking
Getting a higher ranking is a process that can last weeks, or months (or even years).
So, don’t waste time looking for a small change and focus on the global and organic growth of your site.
3. Increase Your Social Media Activity
Search engines are very attentive to your activity on social networks and will reward your shares. Pay attention to the social pages of your competition, and try to entice your users to comment and share your posts on their pages.
The resulting visibility will be really useful for scaling search engines.
4. Build Quality Backlinks
Better a few links, but good! This is the basic rule for getting backlinks that can get you on search engines.
We recommend that you build a connection network only with targeted backlinks, which refer to content well indexed on Google.
5. Surround The Link With A Descriptive Text
In addition to putting a keyword in the anchor text, it is important to surround the link with a descriptive text.
In other words, you must insert the link containing the keyword in a meaningful speech that refers to that topic.
6. Make Sure You Don’t Have Broken Links
Use Broken Link Checker plugin and find out how to fix broken links on WordPress.
The links that do not lead anywhere, causing a 404 error, certainly determine an important penalty for SEO.
7. Optimize Each Page For A Single Keyword
Don’t try to do it for multiple keywords at the same time. Otherwise you risk to create artificial contents, inconsistent with the objective of the post, boring in reading.
If anything, try to insert logical and effective sentences around the keyword and underline the importance of the same.
For example, if you are looking to rank for herbs and spices for sale words, try to write informative and in-depth content about this topic, something that will offer value to the readers.
8. Network With Other Bloggers
Connecting with other bloggers in your niche can help you build quality backlinks. Attend forums that share your same interests and the same market share.
Identify possible collaborations and synergies that can be a determining factor for your success on the web.
9. Make Your Site User-friendly
A well optimized site for SEO is well structured and user-friendly. Don’t burden the site with dispersive and uncomfortable graphic effects, make sure that your visitors can easily find what they are looking for, with a few simple steps.
Of all the SEO tips for WordPress, this is certainly the most theoretical. But with a little common sense, it will not be difficult to put it into practice.
10. Meta Descriptions Are Important
Although it does not have an actual value from the point of view of the SEO, a well made meta description is able to attract more visitors.
Pay attention when entering the most important part of the topic you are dealing with, so as to immediately give an excellent preview of your article.
11. Create a Descriptive URL, Separating the Words
This will facilitate the optimization of the page or article.
Make sure that the post title is present in the URL, or in any case words that are strictly related to your brand. Absolutely avoid references to numbers or ids that are difficult to understand.
Seniors for Seniors is the perfect example of this strategy.
12. Use Google Trends
Use it to learn about the topics and trends that generate the most traffic.
You can directly compare the trend of your site with the general one of the network and find topics of great interest to be treated.
Final Words
Now, you have read some tips to consider to improve the SEO of your site. If you follow these suggestions for WordPress, integrating them with all the tools and plugins you have available, you will be able to optimize your blog and index it better on search engines.
In any case, you must constantly keep an eye on all aspects of your site, both graphic and textual, as presented in the list of this article.
Do you have other SEO tips for WordPress that you want to suggest?
Please share them in the comments below, thanks!
12 WordPress and SEO Tips To Optimize Your Blog published first on https://mysingaporepools.weebly.com/
0 notes